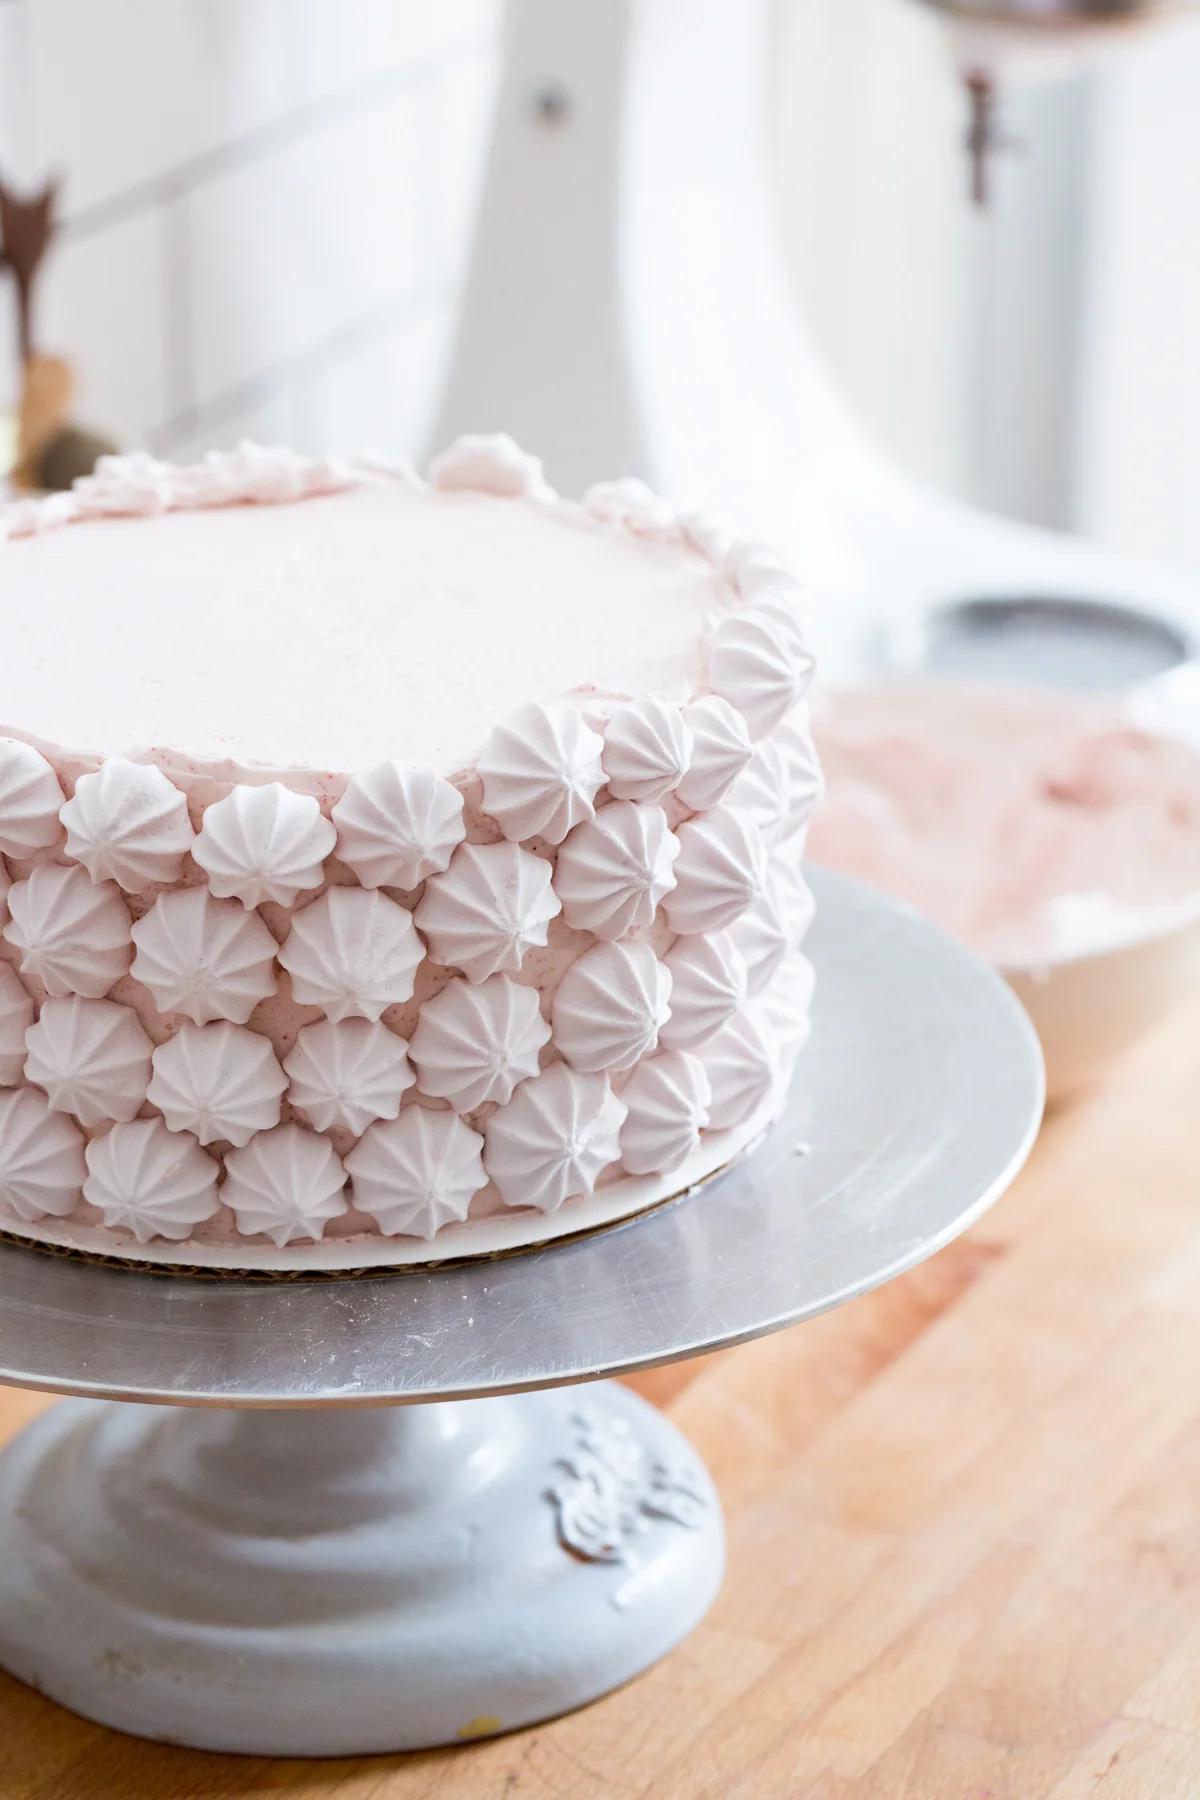
This is a cake so good I had to make it twice. The first time was because I had this idea that covering a cake in little meringues would be an easy and fun way to finish a cake, and it was - did you watch the video?! Then, a couple of days later I made it a second time because a friend asked me to make a cake for a baby shower and this one was so freaking delicious I knew it would be a hit - minus the meringues because I was out, but plus some delicious meyer lemon cream so win/win.
I used Sarah's wonderful Yellow Cake recipe from The Vanilla Bean Baking Book for both iterations. The first time I filled it with a quick jam made from a bag of frozen raspberries, sugar, and lemon - the second time it got a little fancy upgrade in the filling department and I added a swipe of Meyer lemon cream made using the recipe in the first Tartine book. The second cake got also a thicker coat of swoops of the pink raspberry buttercream rather than the meringue treatment to finish, but they were equally delicious, and pretty if I do say so myself.
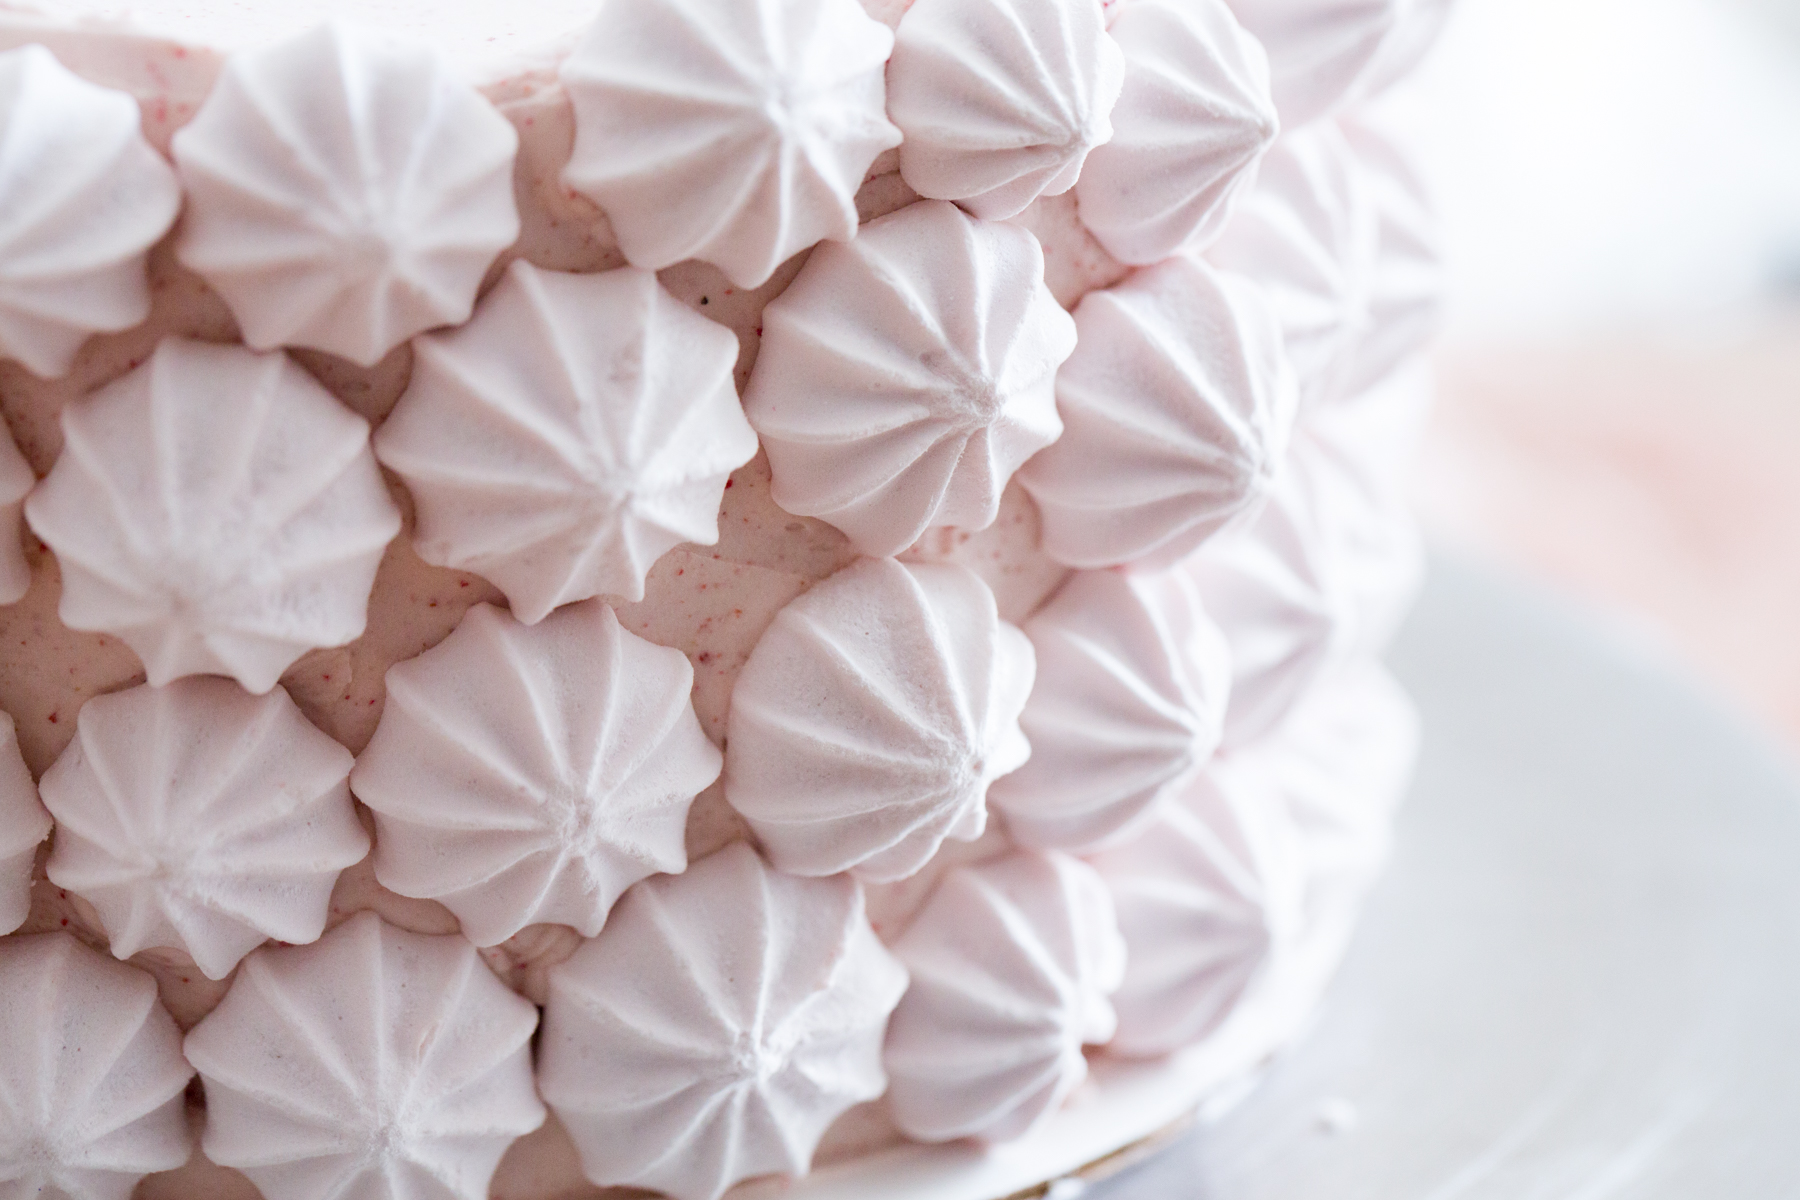
The secret to the perfectly pink raspberry frosting is some pulverized dehydrated raspberries, so cool! I saw that Adrianna from A Cozy Kitchen had made strawberry powdered sugar to dust a batch of beignets and it seemed like the perfect all natural way to add a little something extra to my frosting. I'll definitely be using this technique again!
Meyer Lemon and Raspberry Cake
This cake is a perfect Spring celebration treat. There are quite a few steps, but you can spread them out over the course of a couple of days to make the process easier on yourself. The jam can be made up to a week in advance and stored in the fridge, and the Meyer lemon cream will last for about 5 days in the fridge too. Make the cake layers and frosting the day before you plan to decorate the cake. The cake and frosting can be left, well wrapped at room temperature overnight - any longer and the cake and frosting can be stored in the freezer just make sure to bring the frosting all of the way to room temperature and give it a quick spin in the mixer before you use it.
Also! I used perfectly pink raspberry flavored meringues from my friends at Brooklyn Cookie Company to decorate this cake - the meringues will soften over time so do this step right before you serve the cake for the crunchiest meringue experience. Meyer lemon cream recipe can be found here. Dehydrated raspberries can be found at natural foods stores and Trader Joe's. Phew, I think that's it. Go forth and bake cake!
Yellow Cake from the Vanilla Bean Baking Book
(makes 2 8-inch layers)
3 large eggs, at room temperature
2 large egg yolks, at room temperature
1 tablespoon pure vanilla extract
3/4 cup sour cream, at room temperature
1/4 cup buttermilk, at room temperature
1 teaspoon meyer lemon zest
2 cups (260g) all purpose flour
1 1/2 cups (300g) granulated sugar
3/4 teaspoon baking powder
3/4 teaspoon baking soda
3/4 teaspoon kosher salt
1 cup (225g) unsalted butter, at room temperature, cut into 1-inch pieces.
Center a rack in the oven and preheat to 350ºF. Butter 2, 8-inch pans and line them with parchment paper. Butter the paper then dust the pans with flour.
In a large measuring cup whisk together eggs, egg yolks, vanilla extract, sour cream, buttermilk, and lemon zest. Set aside.
In the bowl of a stand mixer fitted with a paddle attachment, combine the flour, sugar, baking powder, baking soda, and salt. Mix on low speed until combined. Keep the mixer on its lowest setting and the butter one piece at a time, beating until the mixture resembles coarse sand. With the mixer still on its lowest setting, slowly add half the wet ingredients. Increase the mixer speed to medium and beat until incorporated, about 30 seconds. Turn back the mixer to its lowest setting and add the rest of the wet ingredients, mixing until just combined. Increase the speed to medium and beat for another 20 seconds — at this point, the batter may still look a little bumpy, but that's okay! Use a rubber spatula to scrape down the sides and bottom of the bowl, and mix the batter a few more time.
Divide the batter between the prepared pans and use an offset spatula to smooth the tops. Tap the pans gently on the counter 2 times each to help release any large air bubbles. Bake 12-18 minutes, until the cakes are golden brown and pull slightly away from the sides of the pan. A wooden skewer inserted into the center of each cake should come out clean.
Transfer the pans to a wire rack and let cool for 30 minutes. After 30 minutes, turn the cakes out onto the rack, remove the parchment paper, and let cool completely before frosting.
Quick Raspberry Jam
makes about 1 1/2 cups
1, 12-ounce (340g) bag of frozen raspberries
1 cup (200g) granulated sugar
juice of one lemon
Add all of the ingredients to a heavy bottomed, non-reactive pan and stir to combine. Heat over medium heat, stirring occasionally, until the raspberries thaw and start to release their juices. Crank the heat up to high and boil the jam until thickened enough to pass the wrinkle test, about 7 minutes. Press the jam through a fine mesh sieve to remove the seeds if desired. Chill completely before using.
Raspberry Swiss Meringue Buttercream
makes about 3 cups, enough for one 8-inch, 4 layer cake with a bit left over
1 ounce (30g) freeze dried raspberries
4 egg whites
1 cup (200g) sugar
1 pound (450g) butter at room temperature, cut into 1-inch pieces
pinch salt
1 tablespoon vanilla extract
In a high speed blender or food processor, pulverize the raspberries into powder. Sift the powder to remove any large seeds.
In the bowl of a stand mixer, combine the egg whites and sugar. Set the bowl over a pan of simmering water and whisk continuously until the sugar has completely dissolved and the mixture is very warm to the touch, 5-7min.
Using the whisk attachment, beat the egg white mixture until stiff glossy peaks form and the mixture has cooled to room temperature, about 10min.
Switch to the paddle attachment and reduce the speed to low. Add the salt then add butter a few pieces at a time and beat the frosting until smooth. During this step it is very likely that the frosting will "break" and you will think you messed up. Good news! You didn't! Mine breaks sometimes too. All you have to do is turn up the speed on your mixer for a few seconds and the frosting comes back together. Continue until all of the butter is incorporated then add in the vanilla and raspberry powder.
To Assemble the Cake
Peel the parchment paper from the layers and trim the cakes so the tops are flat, then split each cake horizontally in half, making 4 total cake layers.
Place one layer onto a serving platter or pedestal and use an offset spatula to spread about 1/2 cup of frosting on the cake, making it a bit thicker at the edges. Gently spread a few spoonfuls of the jam on top, making sure to stay within the frosting dam at the egdges. (If you’d like to use the lemon cream, raspberry jam instead use a pastry bag to pipe a dam of frosting around the edge then spread the cake with a thin layer of lemon cream followed by the raspberry jam).
Repeat with remaining cake, frosting, and jam. Place the last layer on top, flat side up so the top of the cake will be flat and crumb free. Cover the top and sides of the cake with a thin layer of frosting (crumbcoat) and refrigerate for about 30min.
Pull the cake out of the fridge and add a second, heavier coat of frosting on the top and sides of the cake. Cover the cake with mini meringues if desired. Serve at room temp. Store any extra frosting in an airtight container in the freezer where it will keep for a few weeks.