Spring Things

spring (yossy arefi)-4
spring (yossy arefi)-1
spring (yossy arefi)-5

Cameras have been cleaned, spring has sprung, and I'm back. With rhubarb! I didn't intend to be away from this space for so long, but the photo clinic took a little longer than anticipated to give my old pentaxes a spit shine. It was totally worth it, btw, and they are looking better than they have in years.

In the mean time, it has been a busy spring round these parts: full of lots of fun freelance projects (including a little something that was published in the

NYT

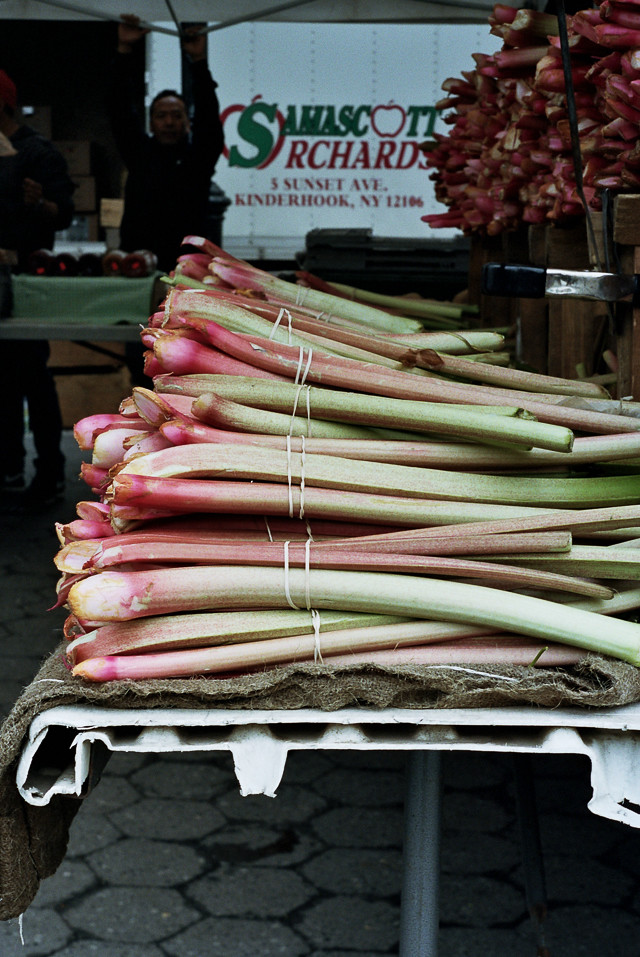
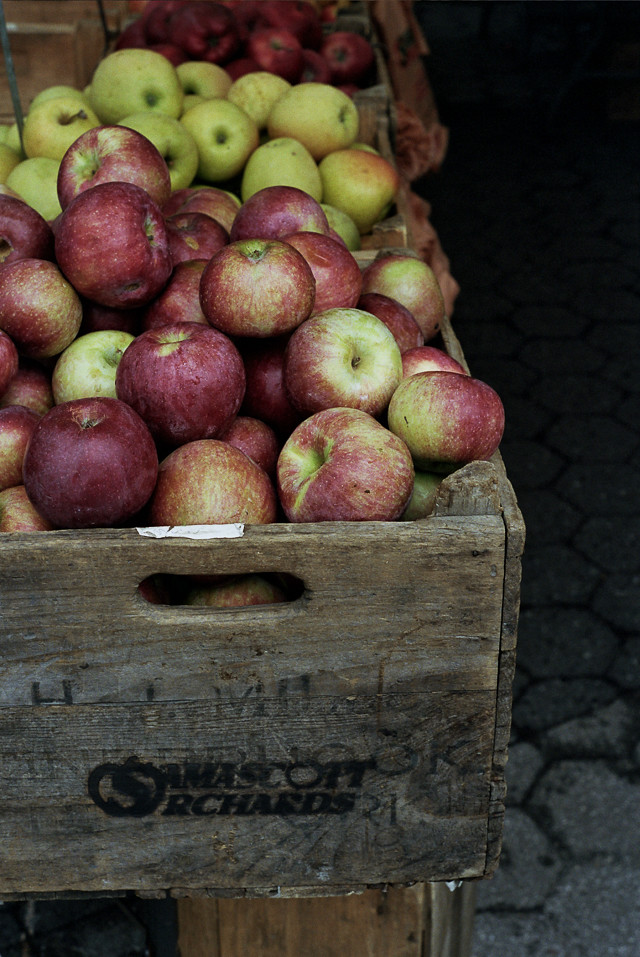
!) and a new addiction/obsession (it's a fine line isn't it?) with making pottery. But now it is time to get back to business and the business at hand today is pies: little portable pies filled with the pinkest rhubarb I've ever bought at Union Square and crunchy apples that are perfect for all of your memorial day picnicking. 

I know it is already strawberry season in many parts of the country, but I just couldn't let May sneak by without posting at least one rhubarb recipe. If you are hankering for more rhubarb find LOTS more rhubarb recipes in the archives of this blog: here.

A few little notes:

Tim from Lottie and Doof wrote an A+ post about #normcore and how it relates to food issues (and lots more). Check it out here. Seriously, I can't recommend it enough.

For my film loving friends, I had my cameras cleaned and repaired at Nippon Photo Clinic in Manhattan. I highly recommend their services.

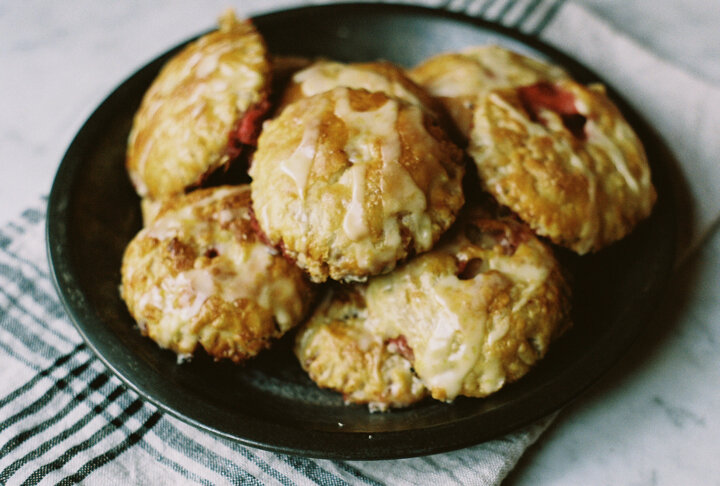
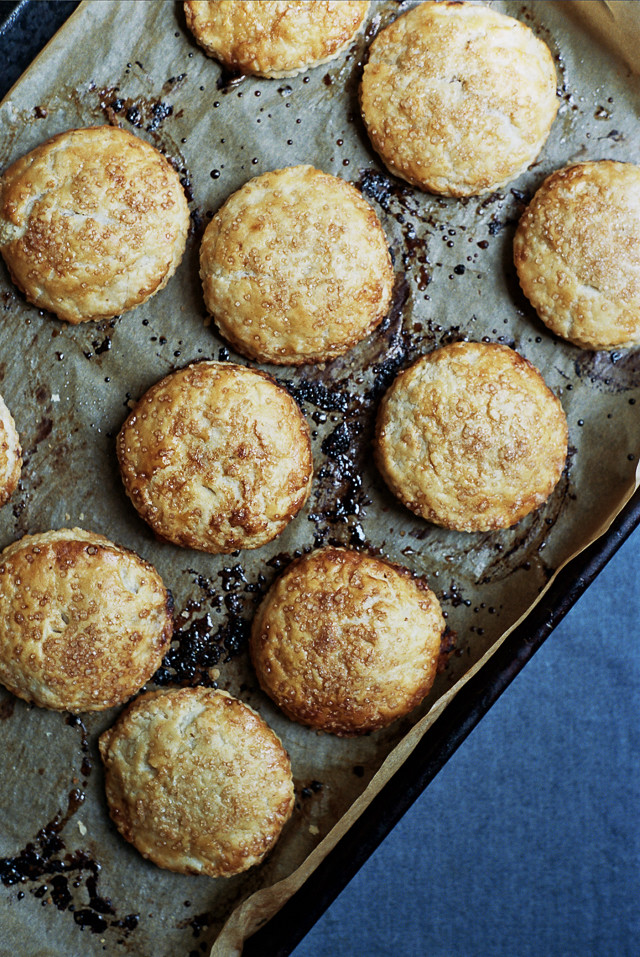
Rhubarb and Apple Hand pies

yield about 24, 3-inch pies

Rhubarb can tend to break down quite a bit when it is cooked, so I added some chopped apples to these little pies for texture and flavor. The other flavorings are quite simple, just a bit of lemon and vanilla, to let the fruit shine. Cooking the filling a bit before baking will help ensure that the filling stays inside the pies, instead of oozing out all over your baking sheet. 

There are a lot of pie crust recipes and techniques on this site, but this simple one is a new favorite. Make sure to handle the dough as little as possible for the most tender and flaky hand pies.

Crust

24 ounces all purpose flour

2 teaspoons salt

18 ounces cold unsalted butter, cut into cubes

6-8 ounces ice cold water

2 teaspoons apple cider vinegar

To make the crust, combine the flour and salt in a bowl. Use your fingers or a pastry cutter to cut in half of the butter until it is the size of peas, then cut in the other half until it is the size lima beans. Some of the butter will be completely worked into the flour, but you should have lots of visible pieces of butter in the dough too. Add the apple cider vinegar to the water and make a well in the center of the flour mixture. Use a gentle hand or wooden spoon to mix the water into the flour until just combined. If the dough seems very dry, add more water a couple of teaspoons at a time. You have added enough water when you can pick up a handful of the dough and squeeze it together without it falling apart. Press the dough together, then split it in half, form into discs and wrap each half in plastic wrap. Chill the dough for at least one hour before using, or overnight.

Rhubarb and Apple Filling

1 pound rhubarb stalks

2 medium baking apples, mutsus work well here

1 vanilla bean

4-6 tablespoons sugar

juice of 1/2 lemon

1 tablespoon unsalted butter

2 tablespoons all purpose flour

egg for egg wash

crunchy sugar such as turbinado or demerara for sprinkling

If your rhubarb has leaves attached remove them (they are inedible and poisonous) then chop the rhubarb into 1/2-inch pieces. Peel the apples and chop them into slightly larger pieces.

Add the chopped rhubarb, 4 tablespoons sugar, lemon juice, butter, and vanilla bean seeds and pod to a large skillet. Cook until the rhubarb has released most of its juices and the juices have thickened, about 7-10 minutes. The rhubarb should become jammy in texture.

Cool the mixture to room temperature, remove the vanilla bean pod then add the chopped apples and flour and stir to combine. Taste the mixture and if it seems too tart add more sugar, 1 tablespoon at a time.

To Assemble the pies

Preheat oven to 400ºF. One at a time, roll each piece of chilled dough roughly 1/4-inch to 1/8-inch thick on a lightly floured surface. Use a 3-inch circle cutter to cut as many circles as possible from the dough. Re-roll the scraps and cut more circles.

Put half of the circles on a baking sheet lined with parchment paper and lightly brush the edges of the dough with a beaten egg. Add about 1 tablespoon of filling to each piece of dough, making sure that there is a small border of bare dough around the filling. Top each pie with another piece of dough and press the edges to seal well. Put the entire baking sheet in the freezer until the dough is firm, about 10 minutes.

Check to make sure all of the pies are well sealed. Brush the pies with a beaten egg and sprinkle with sugar. Bake until deep golden brown, 20-25 minutes. Repeat with remaining dough and filling.

Rhubarb and Strawberry Hand Pies and Pie Crust "Cookies"

rhubarb-and-strawberry-hand-pies_7342887582_o.jpg

I was in the midst of a serious bout with self doubt when I snapped this quick photo. I took just the one frame in case I wanted to share these little pies, right before I ran out the door to meet up with some of my favorite bloggers. There was a lot of hand wringing and ho-humming going on in Apt 2B as I finished up my treats that day and I apparently couldn't seem to focus myself or my camera. Were the hand pies I made as good as I hoped they would be? Were they flaky enough, sweet enough, too sweet, was the glaze too much, can I think of anything else to fret about before I leave the house? Was I just being a Nervous Nellie because I was about to walk into a room full of people I didn't "know"? Yes.

I was silly to doubt the power of a classic combination like rhubarb and strawberries. Especially when they are tucked into Brandi's magical pastry crust (that I have now adopted) with a healthy dose of citrus zest and a little fresh ginger for zip. So, I came to my senses, wrapped them up and hopped on a train to Long Island City where I had the pleasure of meeting and chatting with some super ladies over delicious food and beverages at Veronica's gorgeous rooftop oasis. The evening was full of great conversation and food and it was so nice to meet KeseyKathrynSarahElizabethKimberleyNicoleDianaLauraKristinBarb and Cathy in person. Thanks for a great evening, gals! Hope you enjoyed the pies.

Rhubarb and Strawberry Hand Pies

yield, 15-18 3'' pies

I have to admit, these were kind of a pain in the ass to make, but they ended up being a big hit. So make sure you make them for some folks who will appreciate your hard work.

For the Crust

This crust comes to you from the talented Brandi Henderson of I made that! and The Pantry at Delancey where she teaches a class called "How to be a Pie Ninja" (among others) and she is not messing around, her recipes are killer. For her crust, Brandi uses a technique called fraisage which creates long sheets of buttery flakes throughout the dough instead of little pockets of butter. Delightful!

18 ounces pastry flour

1 teaspoon salt

12 ounces cold, unsalted butter

6-8 ounces ice water

2 teaspoons apple cider vinegar

1. Mix the flour and salt together, then pour the whole lot on a large cutting board or countertop.

2. With a bench scraper, cut in half of the butter until it is the size of lima beans, then cut in the other half of the butter until it is the size of nickels.

3. Using your fingers, flick the water on to the butter flour mixture and gently fold it in with your bench scraper. You have added enough water when you can pick up a handful of the dough and squeeze it together without it falling apart.

4. Then, get this, 

you smear

 the butter into the dough. With the heel of your hand push a section of the dough down and away from you. Congratulations, you have just created a sheet of butter which is going to turn delicious flaky crust. Scrape the sheet off of the board and place it in a bowl to the side. Repeat until you have worked through all of the dough, pushing it down and away from you in sections. Once you've gone through all of the dough gently remove it from the bowl, press it together, then split it in half, and wrap each half in plastic wrap and form into a disk. Chill the dough for at least one hour before using. I have warm hands, so I always chill my dough overnight before I use it.

If this sounds confusing, check out the link above for a really helpful photo tutorial.

For the Filling

4 ounces strawberries, cut into 1/4''-1/3'' cubes

5 ounces rhubarb, cut into 1/3'' cubes

1/2  ounce butter

2 ounces sugar

1/2 teaspoon orange zest

1/2 teaspoon lemon zest

1/2 vanilla bean, scraped

1/4 teaspoon freshly grated ginger

1/2 ounce flour

pinch salt

1. In a medium skillet, combine the rhubarb, butter, sugar, vanilla bean seeds and the vanilla bean pod. Cook over medium low heat until the rhubarb begins to release it's juices, then turn the heat up to medium high. Cook the rhubarb until it is tender, but not falling apart about 5 minutes. Pour the rhubarb mixture along with it's juices to a bowl and refrigerate until cool.

2. When the rhubarb is cool, remove the vanilla bean pod from the mixture. Combine the cooked rhubarb with the strawberries, zests, ginger, salt and flour. Stir gently to combine.

To Assemble and Bake

Pie Crust

Rhubarb and Strawberry Filling

Granulated Sugar for Sprinkling

1 egg for egg wash

2 baking sheets lined with parchment paper

Preheat oven to 400º

1. Remove one disk of dough from the fridge. On a lightly floured surface, roll it out into a rough circle about 1/4'' thick. Using a 3'' biscuit cutter or drinking glass, cut the dough into as many rounds as you can. You should be able to get about 15 and each one will become a mini pie. Transfer the circles to the prepared baking sheets, leaving a few inches in between. Place the sheets in the fridge or freezer while you roll out the other half of the dough, reserve scraps. Roll and cut the other half of the dough.

2. Remove the cut circles from the refrigerator and brush the surfaces with egg wash. Top each circle with about 1 Tablespoon of the filling mixture, then top with one of the freshly rolled circles. If your filling seems really liquidy, focus on filling the pies with the solid fruit. If you have too much juice in the filling, your pies will be a mess and I speak from experience here. Carefully crimp the edges with a fork to seal completely and pop the pies back into the fridge or freezer for 30min to set.

3. Just before you are ready to bake the pies, brush the tops with egg wash, sprinkle them with a bit of granulated sugar and poke a hole or two in the top of each pie for ventilation. Slide the sheets into the oven and bake for 20-25 minutes or until the crust is a

deep golden brown

. Don't under bake your pie crust people, especially when it is filled with juicy fruit! Cool slightly and glaze if desired. See below for an idea of what to do with your pastry scraps.

For the Glaze

8 ounces confectioner's sugar, sifted

juice from 1/2 an orange

1/2 teaspoon orange zest

1/2 teaspoon freshly grated ginger

Whisk all of the ingredients together until smooth. The glaze should be thick but pourable, you may need to add a little more juice or confectioner's sugar for the perfect consistency. Drizzle the glaze over the cooled pies and let sit, undisturbed for 30 minutes to let the glaze harden slightly.

Pie Crust "Cookies"

Don't forget about your pie crust scraps! My mom used to bake up her pie crust scraps for me and my brother so we wouldn't whine about not being able to dig into whatever she was making before it was dessert time.

Take your reserved scraps, put them on a baking sheet, brush them with egg wash (or milk or water in a pinch), sprinkle with cinnamon sugar and bake until deep golden brown and crisp. They are a perfect little snack with tea or coffee and they are great with a bit of ice cream. Do it!

rhubarb-and-strawberry-hand-pies_7157409893_o.jpg