Buttermint Patties

Buttermint PattiesZI4A8204.jpg
Buttermint PattiesZI4A8173.jpg
Buttermint PattiesZI4A8189.jpg
Buttermint PattiesZI4A8210.jpg
Buttermint PattiesZI4A8200.jpg

Anyone else LOVE buttermints? You know, those old fashioned kinda hard, kinda chalky, but also creamy little candies that come with the check at some restaurants? I find them totally irresistible and these little confections have all the creamy, minty deliciousness of a buttermint with the texture, and chocolate coating of a peppermint patty. They are a perfect treat to make for holiday gifts, not too hard, but very special and VERY tasty.

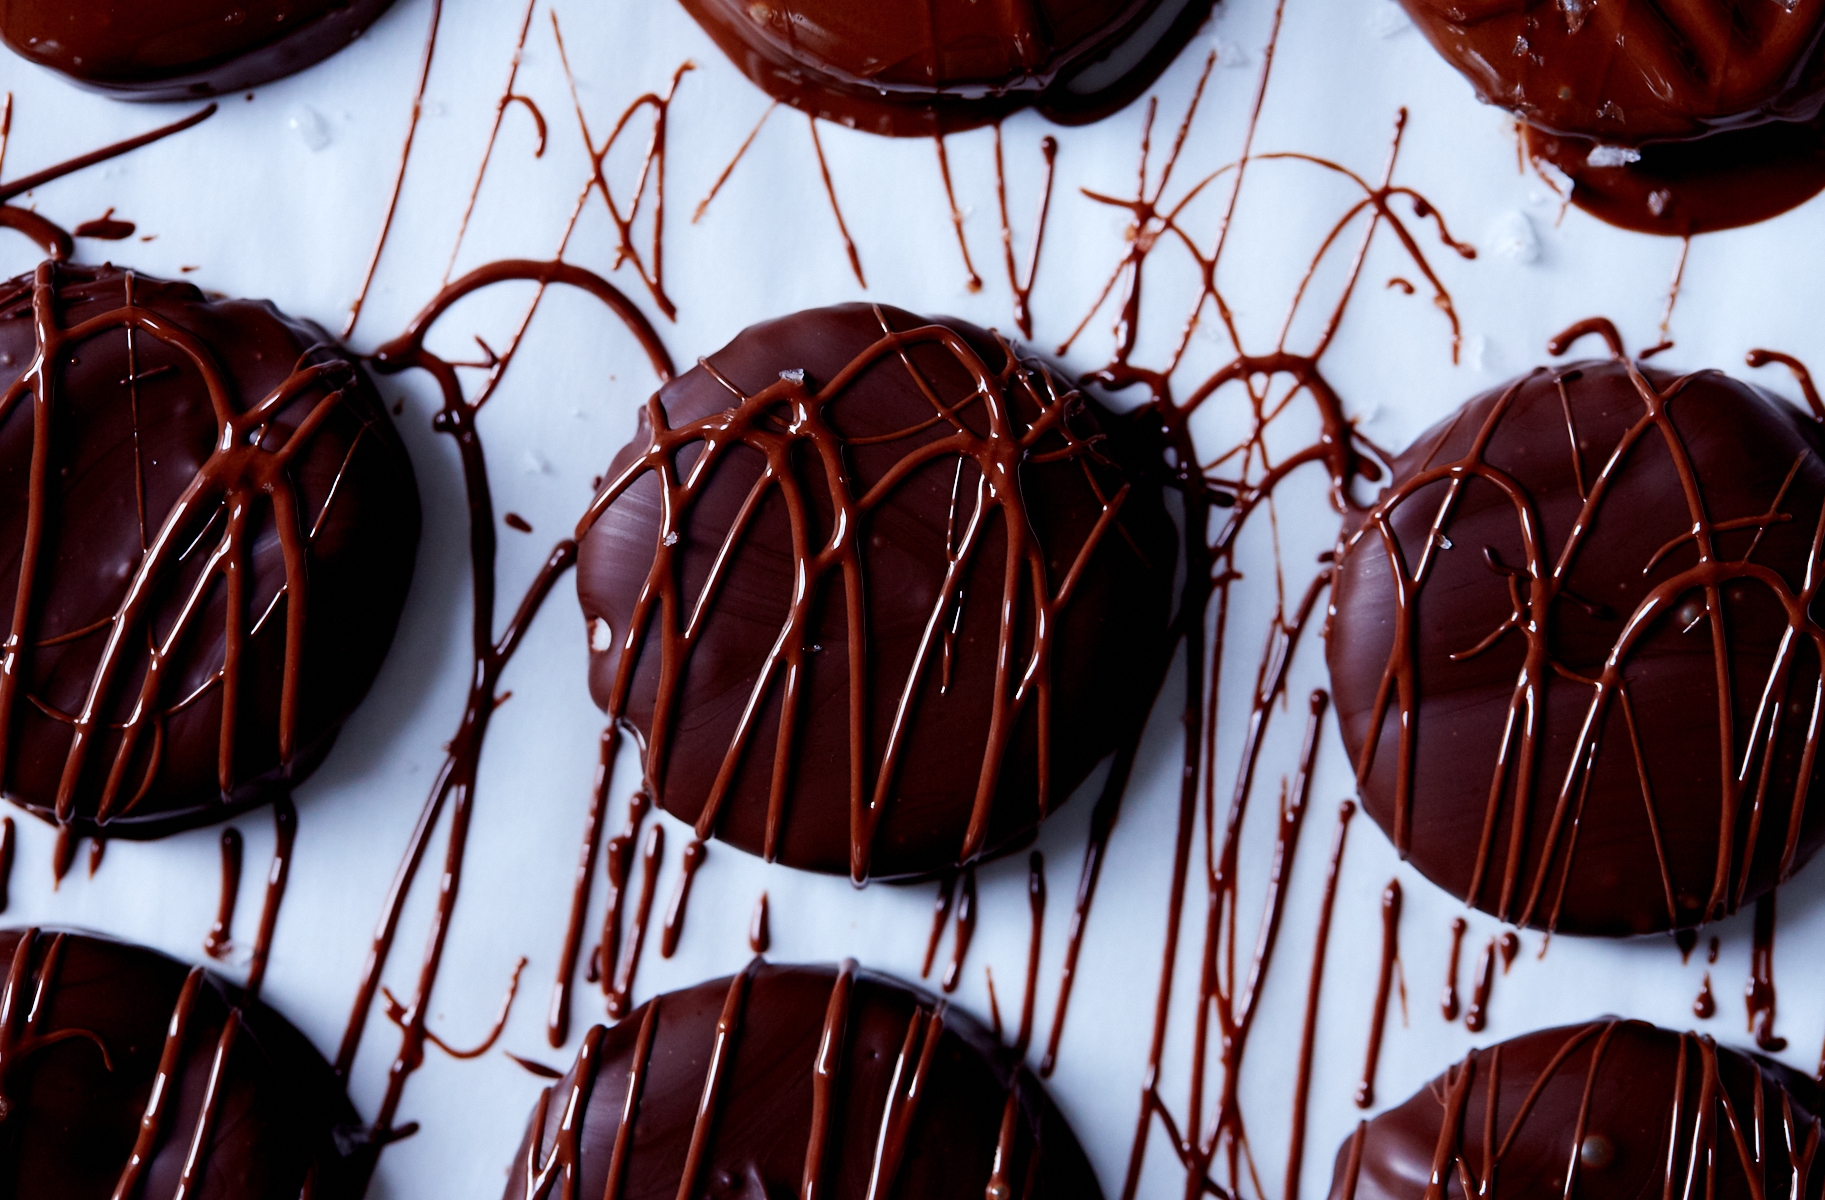
I covered these with (slightly imperfect) tempered chocolate, which gives the candies a crisp and shiny chocolate coating at room temperature, but tempering can be kind of tricky business. I find the seeding method to be the most straightforward. But the great news is, even if your chocolate isn’t perfectly tempered you can just store your mints in the fridge - which honestly I’d recommend anyway because I think these are best served chilled. Here’s another great article by David Lebovitz about tempering.


Buttermint Patties

slightly adapted from Amanda Fredrickson’s Peppermint Patties

makes about 4 dozen, depending on size

You can coat these with any type of chocolate you like. I did some with semisweet and some milk, and some with a little of both. Just make sure to use high quality feves or chocolate bars - do not use chocolate chips which contain stabilizers that you don’t want for a coating like this. You can also top them with a little bit of crushed peppermint candy or cacao nibs. Also, feel free to divide the dough and make half with nibs and half without, which is what I did for the photos in this post.

Filling

5 cups (550g) confectioner’s sugar

3 tablespoons corn syrup

3 tablespoons (45g) cultured butter, softened

2 tablespoons water

2 teaspoons peppermint extrat

2 teaspoons vanilla extract

1/2 teaspoon kosher salt

2 tablespoons cacao nibs (optional)

Topping

18 ounces high quality chocolate (bittersweet, semisweet or milk), chopped

flaky salt (optional)

In the bowl of a stand mixer fitted with the paddle attachment, combine all of the filling ingredients except for the cacao nibs. Mix on low until all of the ingredients are moistened, add the cacao nibs (if using) then turn the mixer up to medium and mix until the mixture is the consistency of play dough.

Turn the dough out onto a piece of parchment paper and place another piece of parchment paper on top. Roll the dough out until it is about 1/4’’ thick. Remove the top parchment and use a 1 1/2 or 2-inch circle cutter (or any other shape you like) to cut as many rounds as possible. Pull the excess dough away from the rounds (the rounds may be soft and tricky to move). Slide the parchment paper with the rounds onto a baking sheet and refrigerate. Gather up the dough scraps, re roll and cut more rounds. Again, transfer the parchment paper with the rounds onto a baking sheet and refrigerate. Repeat until all of the dough is used.

While the rounds are chilling, temper the chocolate. Use a fork to dip the chilled rounds in the chocolate and shake off the excess. Transfer them to a clean piece of parchment paper to dry. Sprinkle with flaky salt or use the fork to drizzle with more chocolate for decoration. Let them harden then store, with layers of parchment in between the layers in an airtight container.

Buttermint PattiesZI4A8181.jpg

Fancy Jello Mold

Photo: Joe Lingeman for NYMAG

I don’t know about you guys, but I think jelly molds are ready for a comeback. Or are they already back? I’ve seen them popping up here and there, and I have made a surprising number of them for photoshoots this year. I have totally fallen in love with their kitchy vibe and stunning colors. They can be totally delicious too! NYMag agrees and they asked me to create a gift worthy jelly mold for their annual gift guide which is on newsstands today. 

Impress your guests this holiday or bring one to a potluck and totally blow your friends minds. All you need is a fun shaped vessel – I like decorative cake pans (Nordicware makes great ones) but you could totally just use a regular glass or stainless mixing bowl, gelatin, juice, and some time. Have fun! Happy Holidays! 


Fancy Jelly Mold

I used Nordicware’s Charlotte Pan for this jelly, which is super cute and the little divots on top are the perfect shape to hold a cranberry or a raspberry. If you’d like to make a larger jelly mold you can double or triple this recipe. This jelly has some Framboise in it, but to make it more family friendly you can substitute cranberry juice for the Framboise. Pomegranate juice will also make a very tasty jelly, but it will be a bit more opaque and tart than the cranberry.

To suspend fruit in a larger mold, let the cranberry jelly mixture set until it is the texture of egg whites. At this point you can fold the fruit into the jelly and spoon it into the mold. The pictured mold uses cranberry juice, but you can also use pomegranate juice. The jelly will be slightly less clear and you will need to add 2 more tablespoons of sugar if using pomegranate juice.

For a clear jelly - Use white cranberry juice (or prosecco!) - every 3 cups of juice will need 2 envelopes of gelatin to set. You can also add a bit of clear liquor to the mix, like elderflower. Yum! If you’d like to add edible flowers, let the jelly set until it is the consistency of egg whites, pour it into the mold and place the flowers in the jelly one at a time. Make sure to arrange them to the prettiest side of the flowers is facing out because we all know this is about looks.

24 fresh cranberries

3 (1/4 ounce) envelopes unflavored powdered gelatin

3 1/2 cups cranberry juice cocktail or pomegranate juice

2 tablespoons sugar 

4 tablespoons Framboise

2 tablespoons lemon juice

1/2 cup sweetened condensed milk 

Food coloring (if desired)


Place 1 cranberry in each divot of the pan and set in the fridge to chill. 

Bloom the gelatin. In a small bowl stir the gelatin into 1 cup of the cranberry juice. Let sit for 5 minutes, until the gelatin is moistened.

Heat 1 cup cranberry juice and the sugar until simmering. Remove it from the heat and stir in the bloomed gelatin. Stir until the gelatin is completely dissolved, warm it gently over low heat if necessary to dissolve the gelatin, but do not boil. Add the remaining cranberry juice, lemon juice, and Framboise, and stir to combine.

Divide the mixture between 2 containers (a measuring cup with a spout works great) and stir the condensed milk into 1/2 of the gelatin mixture. Keep the gelatin at room temperature as you build the layers.

Pour a thin layer of the clear cranberry gelatin over the top of the chilled cranberries in the mold, just to cover the cranberries and the bottom of the mold. Chill until completely firm, about 30 minutes. After it has chilled, gently pour 1/2 of the condensed milk gelatin mixture over the top and refrigerate until completely firm, about 30 minutes. 

At this point, if you’d like the finished mold to be more colorful you can add food coloring to the remaining batches of gelatin. I tinted the bottom layer of the pictured mold with a tiny bit of orange.

Pour a layer of the cranberry gelatin over the chilled condensed milk gelatin and refrigerate until firm. Finish with the last layer of condensed milk gelatin and chill until completely firm, 4 hours or overnight. If the remaining gelatin hardens in between these steps you can very gently warm it over low heat. Do not boil it or it will not set.

To unmold, dip the gelatin mold in warm water for about 10 seconds. Place a serving platter over the top and invert. The gelatin should gently fall onto the plate. If it doesn’t quickly dip it in warm water again. Slice and serve!