Cranberry and Apple Cider Caramel Pie

This Cranberry and Apple Cider Caramel Pie is a perfect Fall treat. With a crisp, tender all butter crust, this lattice topped beauty would be perfect at any holiday table.

CranberryAppleCiderPie_YossyArefi+23.jpg

I’ve partnered with Bob’s Red Mill and Bake from Scratch magazine to be part of their Better Baking Academy this year, and I’m talking about one of my favorite subjects - Lattice Topped Pie. Each month they share a new recipe with lots of in-depth step-by-step photos tricks and tips. Head over to Bake from Scratch to see their technique for adding lattice to the top of a custard pie. 

For this recipe, I went with some of my favorite fall fruits - apples and cranberries with a generous amount of apple cider caramel mixed in. The caramel is also delicious on its own or on top of ice cream, I’m sure you’ll find a way to use it. 

CranberryAppleCiderPie_YossyArefi 1.jpg
CranberryAppleCiderPie_YossyArefi 4.jpg
CranberryAppleCiderPie_YossyArefi 7.jpg
CranberryAppleCiderPie_YossyArefi 2.jpg
CranberryAppleCiderPie_YossyArefi 5.jpg
CranberryAppleCiderPie_YossyArefi 8.jpg
CranberryAppleCiderPie_YossyArefi 3.jpg
CranberryAppleCiderPie_YossyArefi 6.jpg
CranberryAppleCiderPie_YossyArefi 15.jpg
CranberryAppleCiderPie_YossyArefi 18.jpg

Lattice topped pies can seem intimidating because at first glance, but once you try it, you realize it’s not as scary as it seems. Here are some tips for pie dough success!

Some Pie Dough Tips

  • Keep everything cold. That means making sure your butter is cold and cubed and the water is icy. You can even chill your bowl and flour if you want to go the extra mile. I usually don’t do this because I work quickly, but it’s a great way to buy yourself some extra chilled time. 

  • Hydrate the dough properly. Add enough water to the dough so it holds together easily, but not so much that it’s wet. Dry dough is a pain to work with because it will fall apart on you and wet dough will be tough and chewy. If you have any dry spots in your dough you can sprinkle a few drops of water just in that spot to hydrate. 

  • Don’t overmix. Make sure that the dough is well and evenly mixed, you can even knead it a few times, but don’t go crazy and knead it like bread dough. You want to press it together firmly, while making sure there are distinct flat bits of butter in the dough that will puff up and make it flaky.

  • Let it rest. Give the dough some time to relax and hydrate. It will make the dough easier to roll out and flakier in the end.

  • Keep it cool (again). There is nothing more frustrating than trying to maneuver warm, melty, falling apart dough into a woven pattern. If they are tearing on you and you get frustrated, try transferring all of the lattice strips to a parchment lined baking sheet to chill for a few minutes while you gather your composure. Better yet, do this before you start weaving if you are worried about it. 

  •  Have Fun! Don’t worry about it too much! No one will notice if your strips aren’t all the same size! Add some decorative cutouts if you are feeling it!

CranberryAppleCiderPie_YossyArefi 19.jpg

This filling combines some of my favorite fall flavors into a gorgeous and delicious holiday showstopper. The cider caramel is just as good on its own as it is combined with these gorgeous fall fruits. Make sure to save the extra to drizzle on top of the warm slices of pie. 

CranberryAppleCiderPie_YossyArefi 26.jpg

Sponsored Post: This post was created in partnership with Bob’s Red Mill and Bake from Scratch magazine.


Cranberry and Apple Cider Caramel Pie

 Dough adapted from Bake from Scratch magazine

Pie Dough 

Makes 1 (9-inch) double crust

 4 cups (500 grams) Bob’s Red Mill Organic All-Purpose Flour

1/4 cup (50 grams) granulated sugar

1 tablespoon (9 grams) kosher salt

1 1/3 cup (303 grams) cold unsalted butter, cut into 1-inch cubes

13 to 14 tablespoons (195 to 210 grams) ice water


Cider Caramel

Makes about 1 1/2 cups 

 1 cup (200 grams) sugar

1/4 cup (60 grams) water

1/4 cup (60 grams) butter

1/2 cup (120 grams) heavy cream

1/4 cup ( 72 grams) boiled cider syrup (see note)

1 teaspoon (4 grams) vanilla extract

1/2 teaspoon (1.5 grams) kosher salt


Filling

 3 medium baking apples  like mutsu or honey crisp (about 450 grams), peeled and thinly sliced

3 cups (345 grams) cranberries

1/2 cup (100 grams) sugar

4 tablespoons (32 grams) cornstarch 

2 teaspoons (4 grams) cinnamon

1/2 teaspoon nutmeg

Pinch salt

1/2 cup (125 grams) cider caramel

Make the dough: In a large bowl, stir together flour, sugar, and salt. Using your fingers to press and cut in each piece of cold butter until mixture resembles coarse crumbs and butter is pea-size to walnut-size, flat shards. Make a well in center, and add 13 tablespoons (195 grams) ice water. Stir with fingers, and knead dough together just until dry ingredients are moistened. Add additional 1 tablespoon (25 grams) water if needed. Alternatively, in the work bowl of a food processor, place flour, sugar, and salt; pulse until combined. Add cold butter, and pulse until mixture resembles coarse crumbs and butter is pea-size. With processor running, pour 13 tablespoons (195 grams) ice water through food chute in a slow, steady stream just until dough comes together. (Mixture may appear crumbly. It should be moist and hold together when pinched.) Add additional 1 tablespoon (25 grams) water if needed.

Turn out dough, and divide in half (about 530 grams each). Shape each half into a disk. Wrap tightly in plastic wrap, and refrigerate for at least 1 hour. Dough may be refrigerated for up to 3 days or frozen for up to 2 months.

Make the cider caramel: Combine the sugar, water, and butter in a medium saucepan. Cook over medium heat, swirling the pan occasionally, until the sugar melts and turns deep amber in color , about 10-15 minutes. Remove the pan from the heat then carefully whisk in the cream, cider syrup, vanilla, and salt. Mixture will bubble vigorously. Let the sauce cool to room temperature before using.

Assemble the pie: On a lightly floured surface, roll half of Pie Dough into a 13 1/2-inch circle (3/16-inch thick). Transfer to a 9-inch pie plate, pressing into bottom and up sides. Freeze until firm, 20 to 30 minutes.

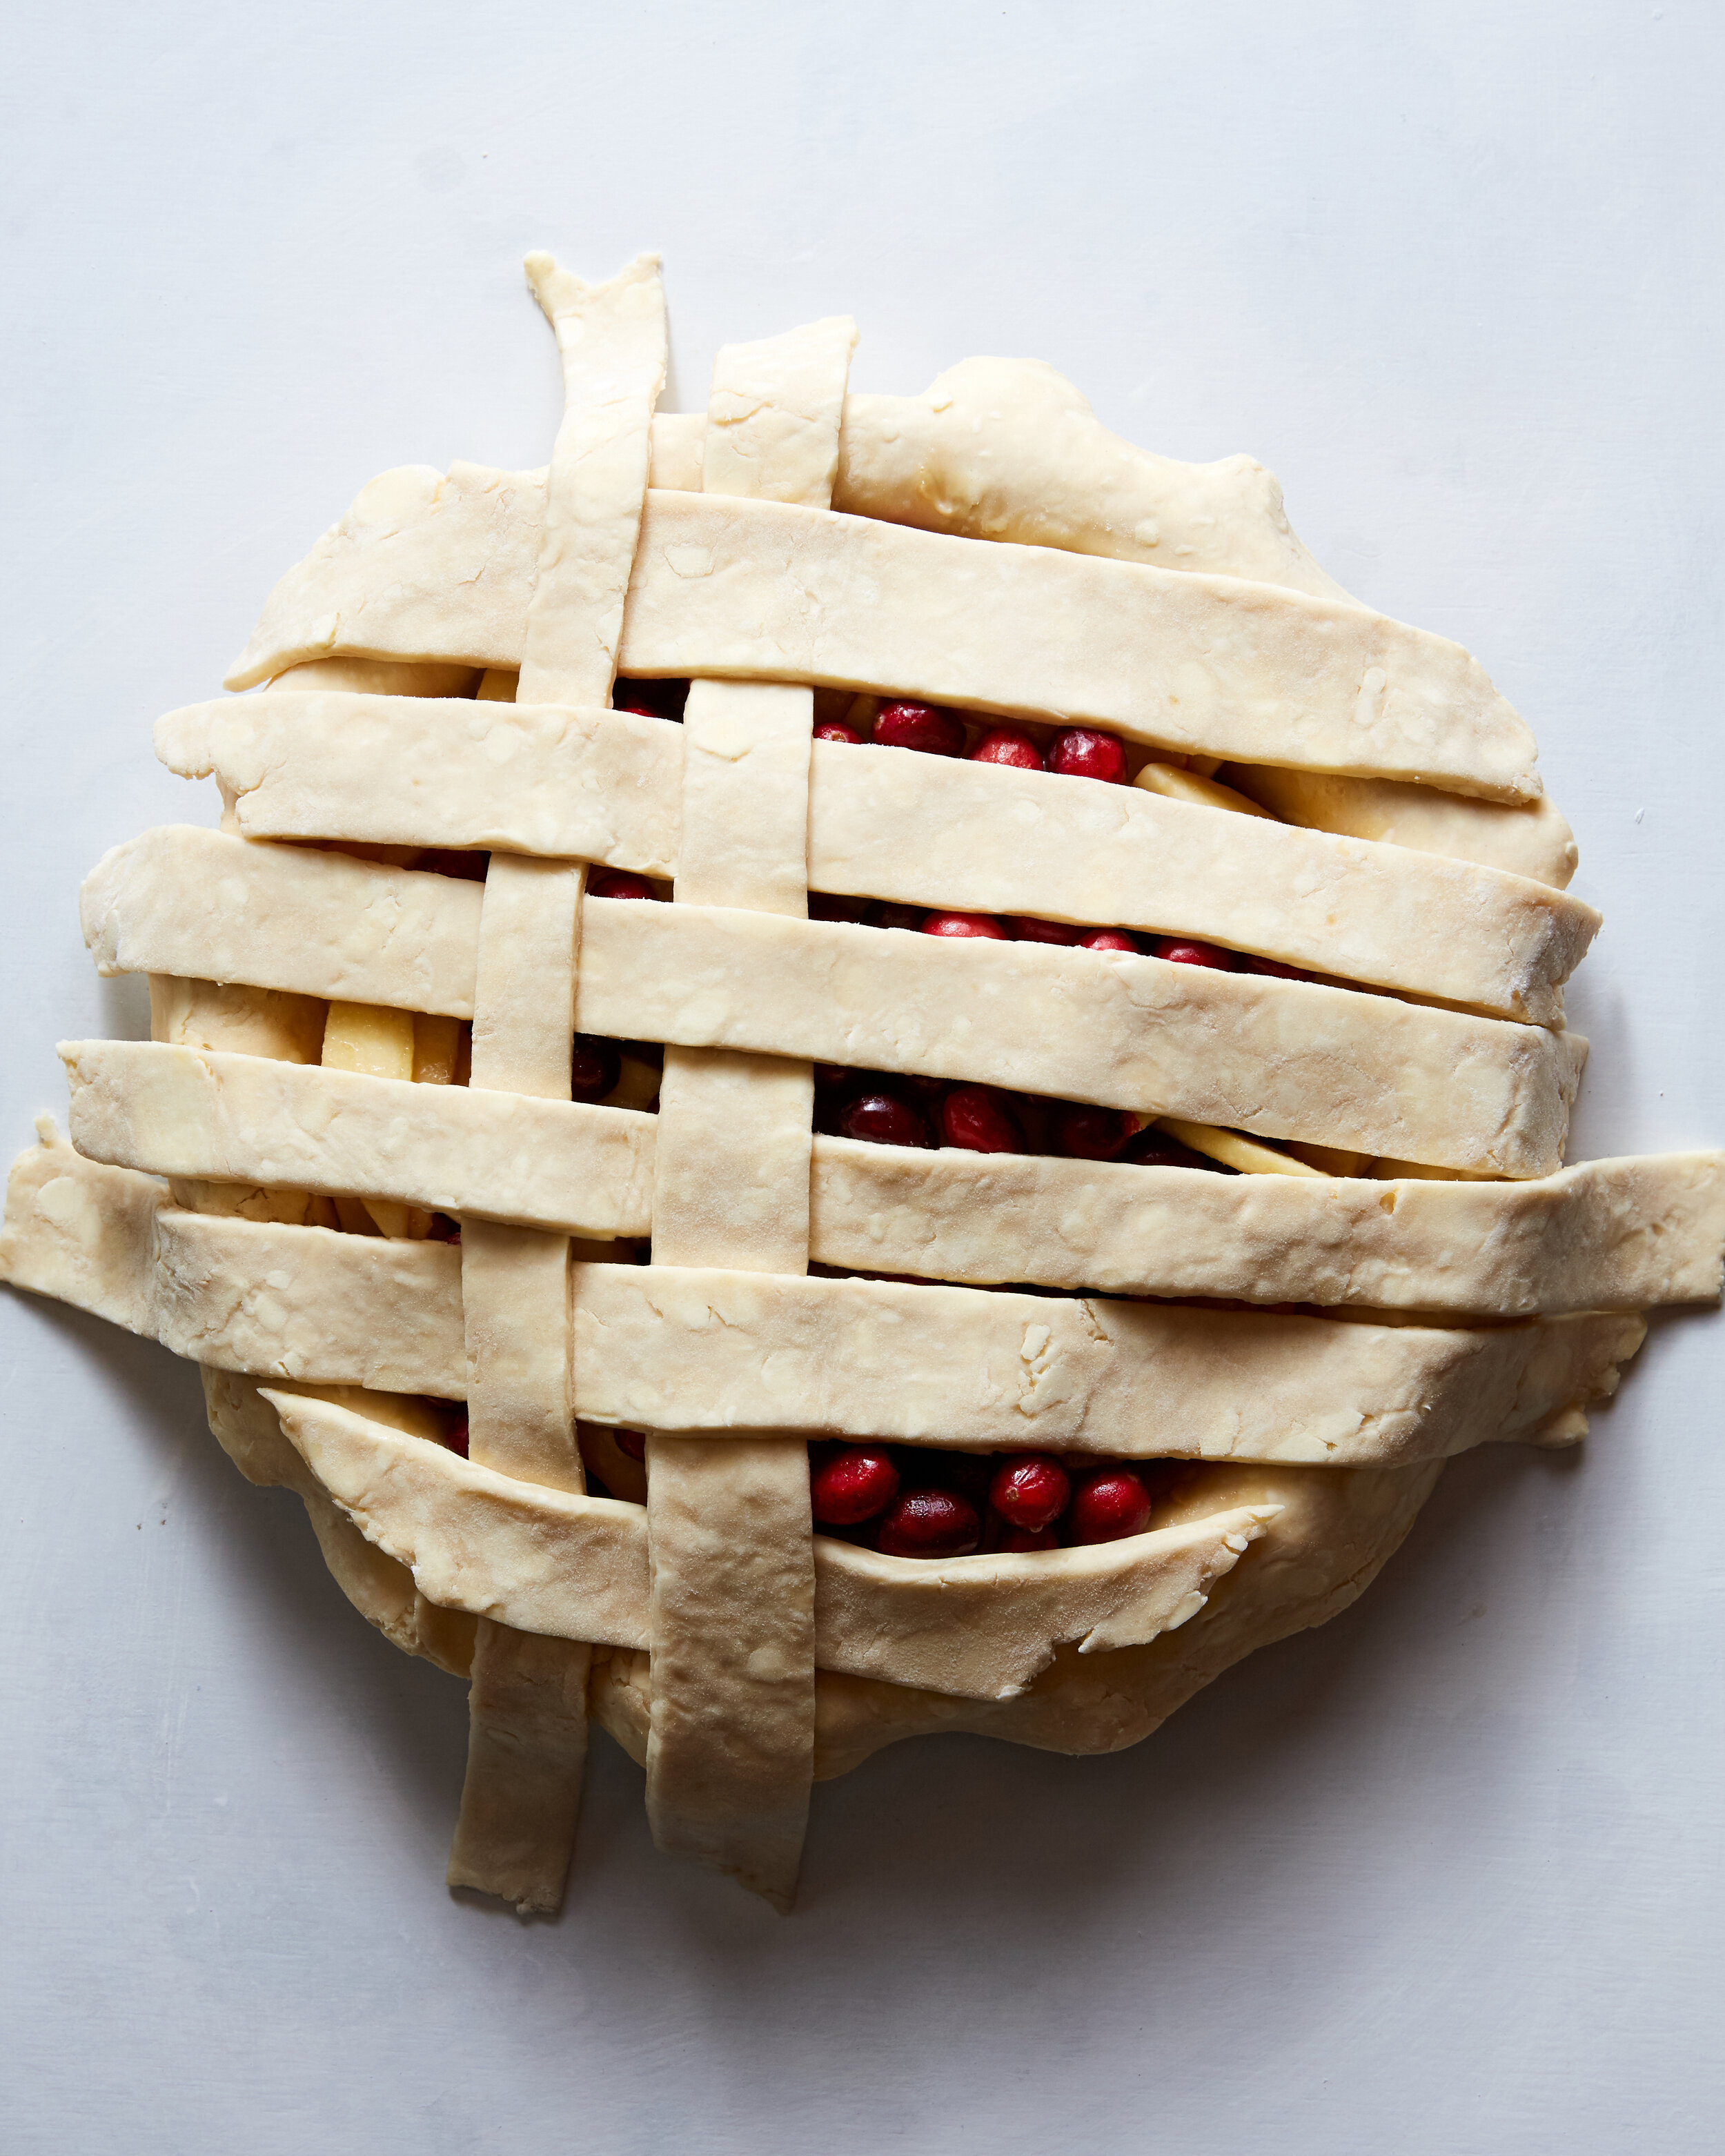
Prepare the filling: In a large bowl combine the sliced apples, cranberries, sugar, cornstarch, cinnamon, nutmeg, and salt. Toss gently to combine. Drizzle the caramel over the top and stir gently.

Assemble the pie: Transfer the filling into the chilled pie dough and press gently to compact the fruit. 

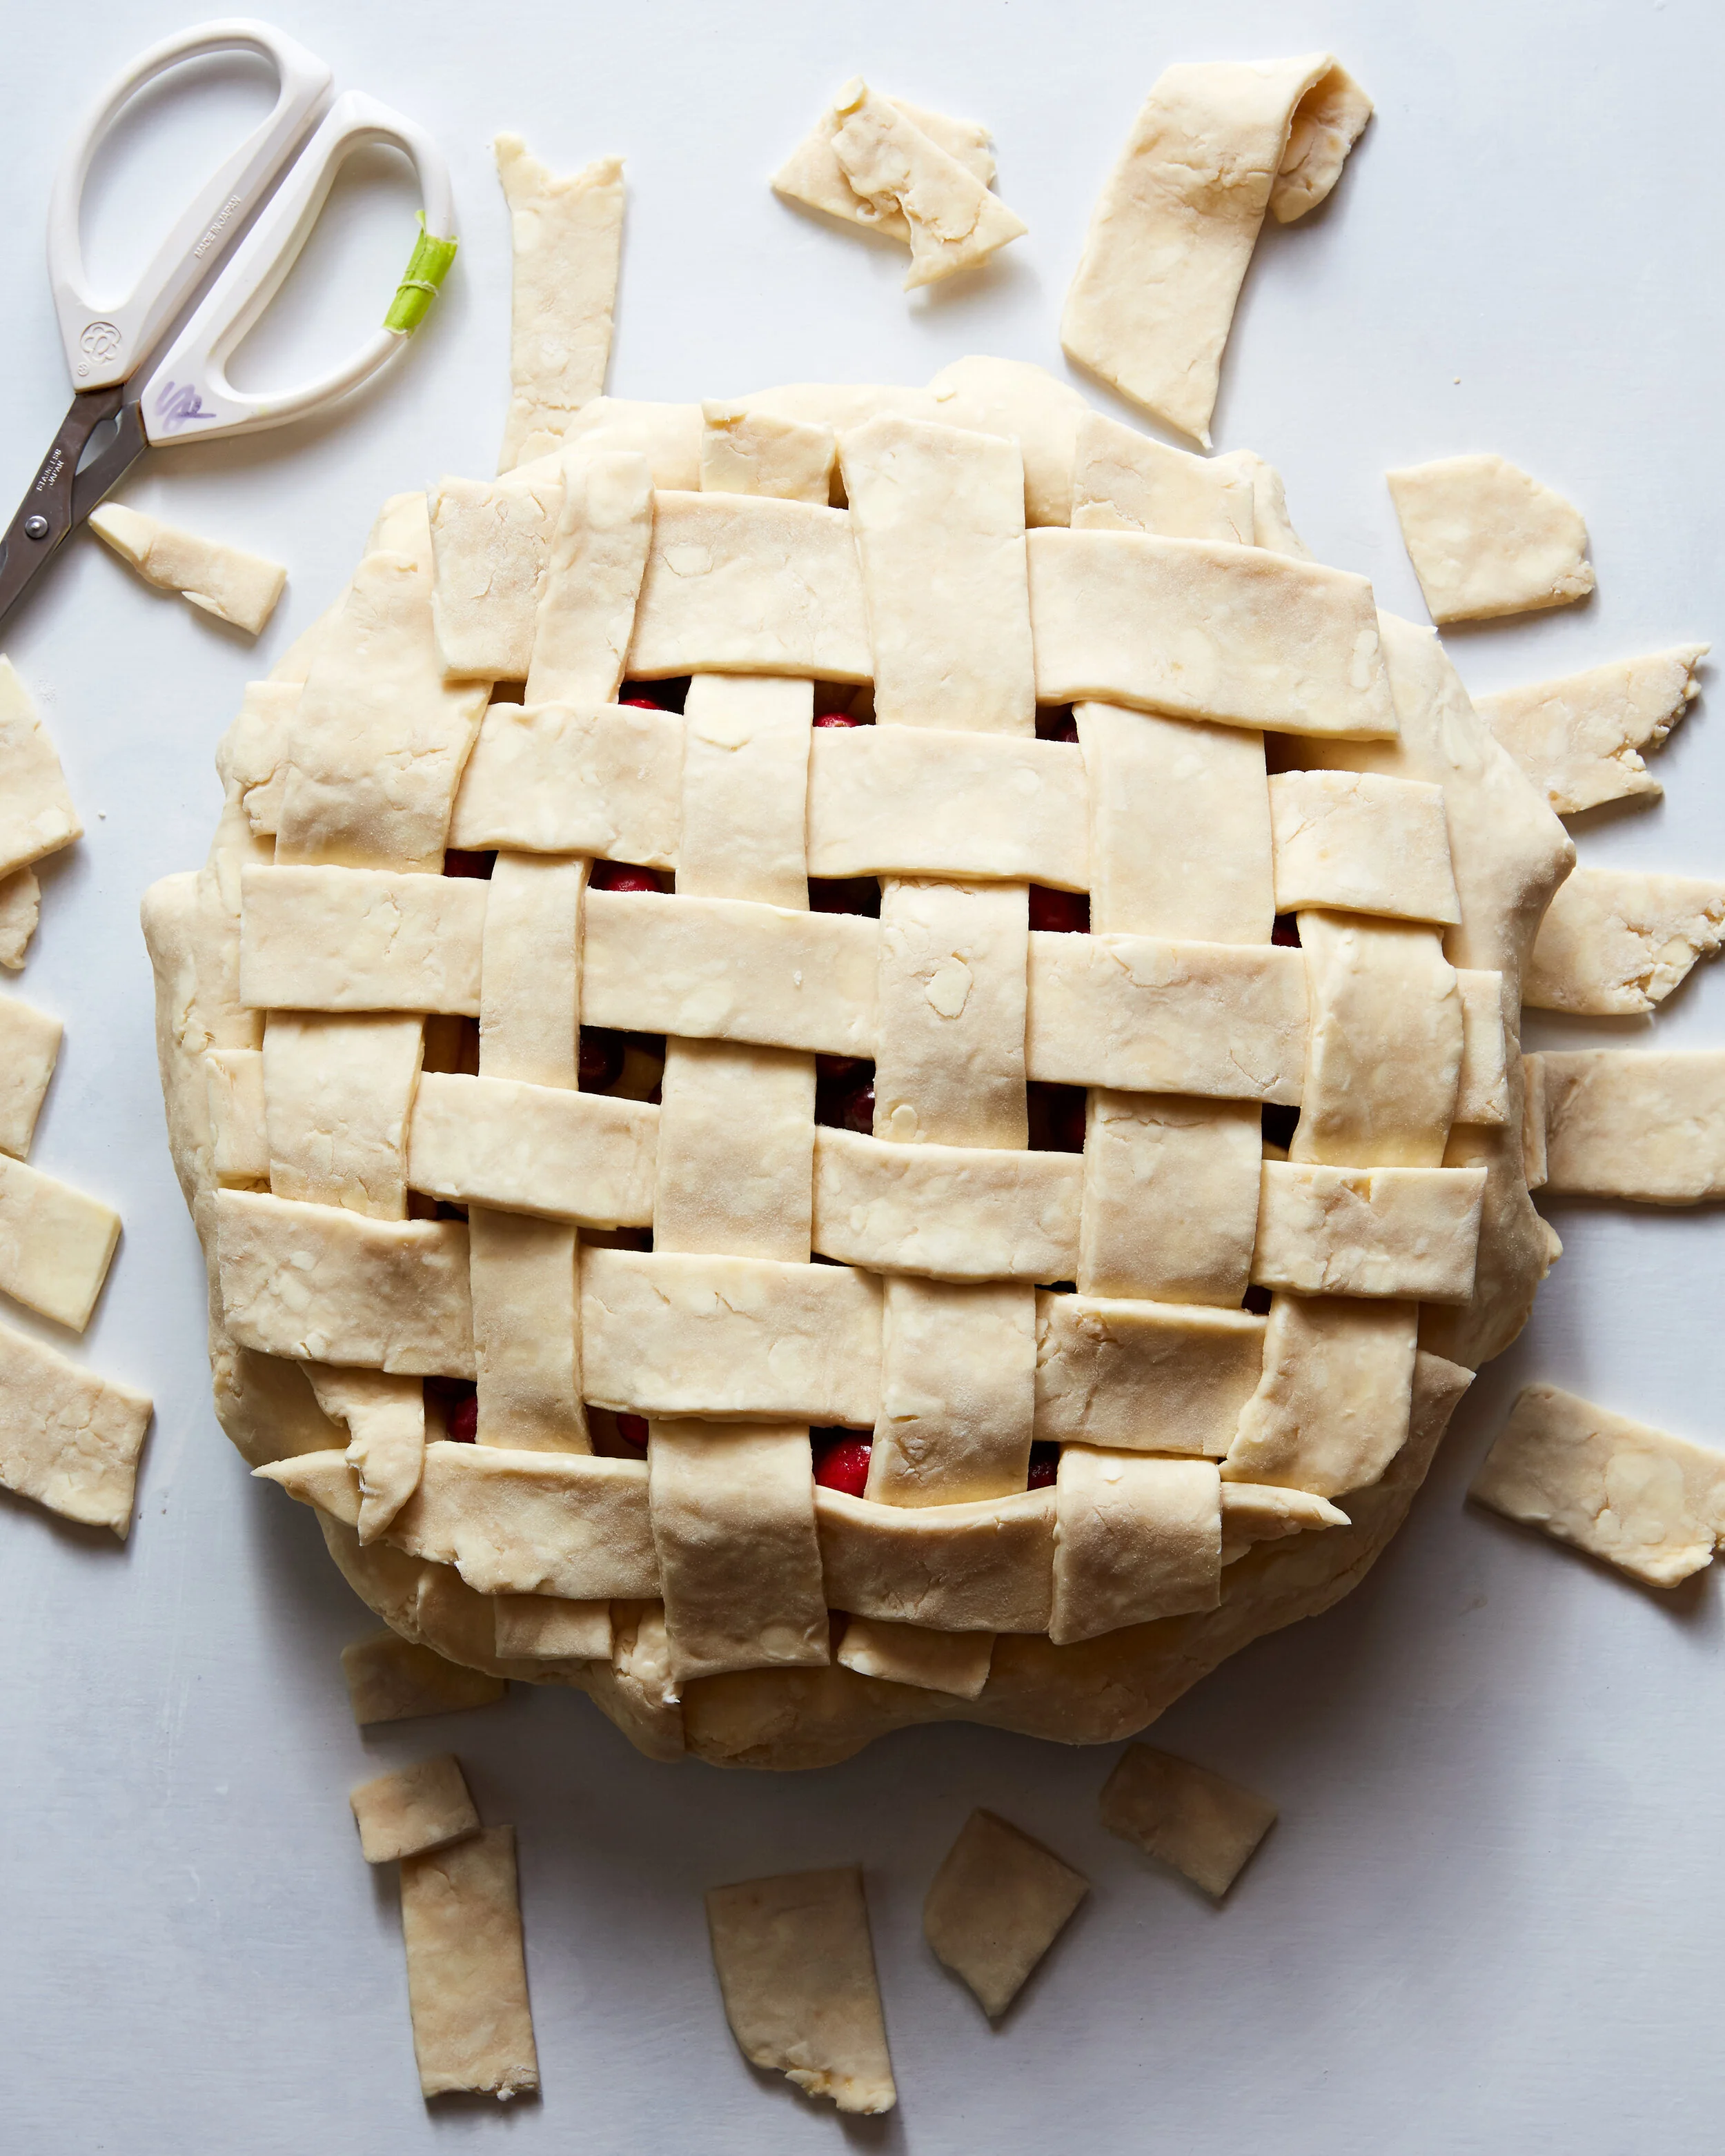
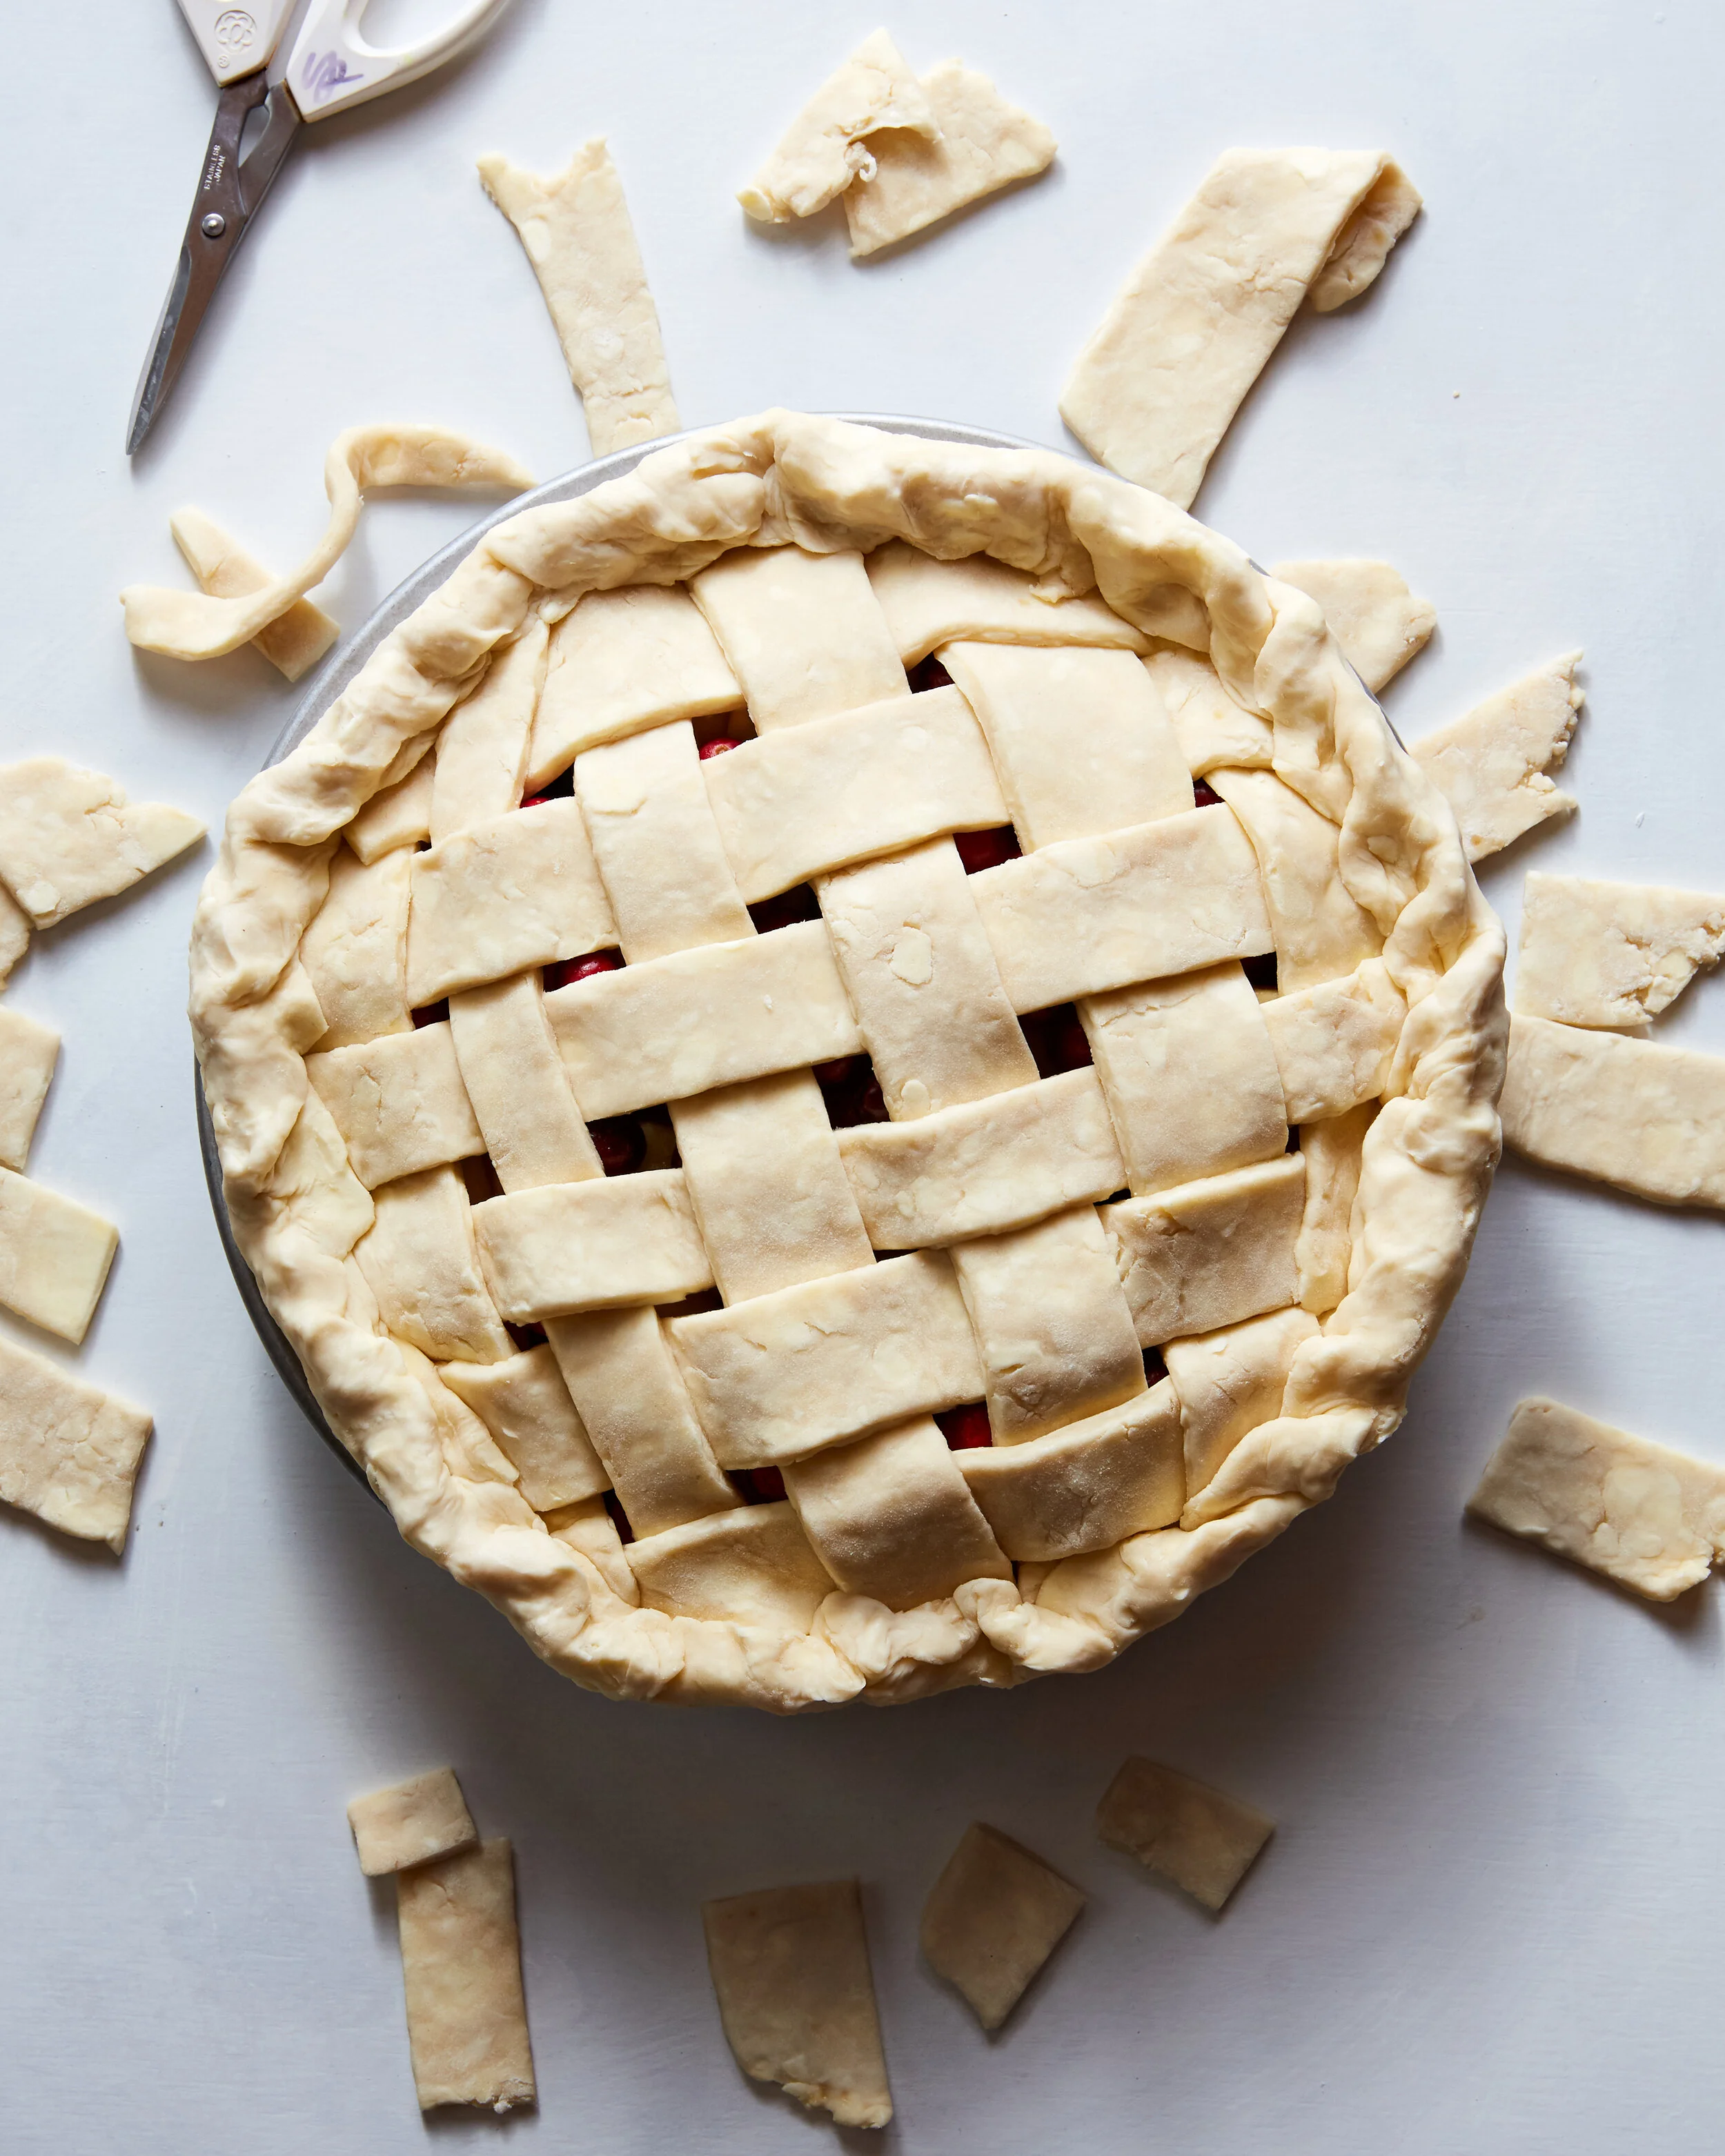
On a lightly floured surface, roll remaining Pie Dough into a 14-inch circle (1/8 inch thick). Using a pastry wheel, cut 2 inches off one side of dough; set aside. Starting at cut edge, cut 12 (3/4-inch-wide) strips; set aside any unused rolled-out Pie Dough. Place 6 strips horizontally over the filling. Fold back alternating strips, and place 1 strip vertically across horizontal strips; unfold strips. Repeat weaving with remaining strips, starting and ending at 1-inch marks and spacing strips 3/4 inch apart. Using kitchen scissors, trim strips even with the bottom crust, leaving about 1/2-inch overhang. Roll the bottom crust up and over the trimmed lattice and press gently. Use a fork dipped in flour to press the rolled edge down onto the pie pan. Use scissors to trim the fork-crimped edge flush with the pie pan. Place the pie on a baking sheet. 

 If desired, use small decorative cutters or scissors to cut remaining rolled-out Pie Dough and scraps and place on baking sheet around the pie. Refrigerate until firm and ready to use, 20 to 30 minutes.

Bake the pie: Preheat oven to 400°F (200°C) with a rack set in the bottom third. 

 In a small bowl, whisk together 1 egg (50 grams) and 1 teaspoon (5 grams) water. Brush lattice with egg wash. Brush bottom of each cutout with egg wash, one at a time, and place around outside edge of lattice, overlapping slightly. Brush tops of cutouts with egg wash. 

Bake the pie for about 1 hour or until it is deep golden brown and the juices are bubbling. If the edges begin to darken before the filling is bubbling, tent the edges with aluminum foil. Let cool before slicing. Serve with additional cider caramel sauce.


Note: Boiled cider can be purchased or you can make your own. For this recipe, add 4 cups of apple cider to a large pot set over high heat. Bring the mixture to a full boil, and cook until reduced to 1/2 cup, stirring occasionally. This will take about 30 minutes but keep a close eye on it. It will darken slightly and thicken to the consistency of thin honey when ready.

CranberryAppleCiderPie_YossyArefi 25.jpg

Banana Cream Pie

Classic Banana Cream Pie with a cookie crumb crust, vanilla pudding, fresh bananas, and fresh whipped cream is the treat you need right now.

BananaCreamPie_Apt2BBakingCo6541.jpg

This Classic Banana Cream Pie is from Erin Jean McDowell’s STUNNING new MASTERPIECE - The Book on Pie (affiliate link). This book has something for everyone from brand new beginners to experienced bakers looking to up their game.

BananaCreamPie2.gif

There are recipes for everything from perfect dough to some of the most beautiful decorative crusts, juicy fruit fillings, and towering gorgeous toppings I’ve ever seen. For my first bake from the book, I wanted to choose a classic and also something with PUDDING and whipped cream. Because, hello, pudding is an incredibly delicious food that doesn’t get enough credit.

BananaCreamPie_Apt2BBakingCo6533.jpg

Erin’s version of this classic has a roll out crust, but had some chocolate cookies and biscoff to use up (and I didn’t have the patience to chill pie dough) so I went the crumb crust route, but I don’t think Erin would mind. The book is made to mix and match crusts, toppings, and fillings to your hearts content, and every recipe has amazing troubleshooting tips and variations too. Happy Pie Baking everyone!

The Book on Pie Cover.jpg

Classic Banana Cream Pie

Excerpted from THE BOOK ON PIE © 2020 by Erin Jeanne McDowell. Photography © 2020 by Mark Weinberg. Reproduced by permission of Houghton Mifflin Harcourt. All rights reserved. 

MAKES: ONE 9-INCH/23-CM PIE

DIFFICULTY: MEDIUM

FILLING

452 g / 2 cups whole milk

118 g / 1/2 cup heavy cream

150 g / 3/4 cup granulated sugar

37 g / 1/3 cup cornstarch

3 g / 3/4 teaspoon fine sea salt

56 g / 2 large eggs

64 g / 3 large egg yolks

28 g / 1 ounce / 2 tablespoons unsalted butter

10 g / 2 teaspoons vanilla extract 

One 9-inch / 23-cm pie crust (see below), blind-baked, and cooled completely

450 g / 3 or 4 medium bananas, peeled and thickly sliced

Full Batch of Classic Whipped Cream (page 111/below)

1.     Make the filling: In a medium pot, bring the milk and heavy cream, to a simmer over medium heat, stirring occasionally.

2.     Meanwhile, in a medium bowl, whisk the granulated sugar, cornstarch, and salt to combine. Add the eggs and yolks and whisk well to combine.

3.     When the milk mixture comes to a simmer, pour about one quarter of it into the eggs, whisking constantly to temper them. Pour this mixture back into the pot, whisking constantly. Reduce the heat to medium-low, switch to a silicone spatula, and cook, stirring constantly, until the mixture thickens and large bubbles break the surface. Remove from the heat and stir in the butter until it’s melted and the pudding is smooth. Stir in the vanilla.

4.     Strain the pudding into the cooled pie crust and spread into an even layer. Cover the filling with plastic wrap placed directly against the surface and refrigerate until fully cooled and set, at least 2 hours (or up to 24 hours).

5.     When ready to serve, remove the plastic wrap and arrange the bananas in an even layer on top of the pie, overlapping the slices so they are well packed together. Spread, spoon, or pipe the whipped cream topping on top. 

MAKE AHEAD AND STORAGE

The crust can be blind-baked up to 24 hours head. The pie can be prepared through step 4 up to  24 hours ahead and kept refrigerated. Store leftovers in the refrigerator in an airtight container.

 Basic Crumb Crust

MAKES: ONE 9-INCH/23-CM PIE

DIFFICULTY: EASY

Crumb crusts are even easier than press-in cookie crusts. You don’t even have to bake them—see the variation at right. The crumbs can be made out of cookies, crackers, cereal, pretzels, even potato chips! Sometimes sugar or other flavorings are added to the crumbs (here the sugar is optional), and then fat (usually melted butter) is added to bind the mixture to form a crust. The crumbs can be coarse, for a crunchier texture, or finer, for a smoother texture. Different base ingredients will behave differently, so the first time I test a crumb crust with a new ingredient, I always have a little extra on hand in case I need more crumbs, or a little extra melted butter, should it be needed.

Crumb crusts don’t generally require chilling before baking, but you can refrigerate for up to 1 hour or freeze for 15 minutes, if desired, to firm them up before baking. I’m also including information in a chart on page 40 to help you adapt this easy recipe for any pan size.

 210 g / 1¾ cups cookie, cereal, chip, or cracker crumbs (I used half chocolate cookies and half biscoff -Yossy)

Up to 50 g / ¼ cup granulated sugar (optional) (I skipped it because my cookies were very sweet - Yossy)

2 g / ½ teaspoon fine sea salt

85 g / 3 ounces / 6 tablespoons unsalted butter, melted, plus more if needed

1.     In a medium bowl, stir the crumbs, sugar, if using, and salt together to combine. Stir in the melted butter and mix to combine. The crust should easily hold together in clumps when you press it together between your fingers (if it doesn’t, add a little more melted butter, 14 g /  1 tablespoon at a time, until it does).

2.     Press the crust evenly into the bottom and up the sides of an ungreased 9-inch / 23-cm pie plate: First make an even layer in the bottom of the pan, then press the rest of the crumbs up the sides (or halfway up the sides—see page 61). Sometimes I use the bottom of a small dry measuring cup to help press the crust in evenly; this is especially helpful in the corners of the pan.

3.     Preheat the oven to 350°F / 175°C (don’t use a Baking Steel/stone when baking a crumb crust). To parbake the crust, bake (no docking or pie weights required) for 10 to 12 minutes, until it begins to lightly brown at the edges (or, for darker crumbs, smells lightly toasty). To blind-bake the crust, bake for 15 to 17 minutes, until it is deeply golden brown and/or smells toasty.

PIE PEP TALK

What to Do When a Crumb Crust Shrinks: One of the most common problems I’ve seen with crumb crusts is that they can shrink or slump down the side of the pie plate when the crust is parbaked. Luckily, this is easily corrected. If you notice that your crust is starting to shrink, remove it from the oven and use a crust tamper (see page 20) or a small metal measuring cup to press the crust that slumped down back up the sides of the pie plate. If this happens consistently when you make crumb crusts, try tamping them down more aggressively and/or refrigerating for 30 minutes before baking.

Classic Whipped Cream

MAKES: 141, 283, OR 422 G / 1, 3, OR 4 CUPS, DEPENDING ON THE BATCH YOU CHOOSEDIFFICULTY: 

DIFFICULTY: EASY

It’s never a bad idea to serve pie with plenty of whipped cream. Think your pie is sweet enough? You can leave the sugar out—ain’t nothin’ wrong with plain ol’ whipped cream. For a luxurious twist, try the mascarpone variation below.

 FULL BATCH (for generously covering the whole pie)

235 g / 1 cup heavy cream

50 g / 1/4 cup granulated sugar

5 g / 1 teaspoon vanilla extract (optional)

1.     In the bowl of a stand mixer fitted with the whip attachment, whip the cream on medium-low speed until it begins to thicken, 1 to 2 minutes. Increase the speed to medium and add the sugar in a slow, steady stream, then continue to whip to medium peaks. Add the vanilla, if using, and mix to combine.

 MAKE AHEAD AND STORAGE

Plain whipped cream is best made just before it is used, but you can intentionally under-whip the cream (to just under soft peaks), then finish by whipping by hand when you’re ready to serve. It will hold this way for up to 4 hours. The mascarpone variation can be made up to 6 hours ahead and held in the refrigerator. Whip a few times gently to refresh before using.


Excerpted from THE BOOK ON PIE © 2020 by Erin Jeanne McDowell. Photography © 2020 by Mark Weinberg. Reproduced by permission of Houghton Mifflin Harcourt. All rights reserved. 


BananaCreamPie_Apt2BBakingCo6539.jpg