Real Deal Cherry Pie

I had the good fortune of a day off right at the beginning of sour cherry season last week (What, you don’t mark the weeks of summer using hyper-seasonal fruit as a guide? Just me?) so I put on some sunscreen and a hat, hopped in the car, and went in search of a u-pick farm. I was not disappointed to find a row of trees, heavy with fruit and not a soul in site at a farm a few hours from Brooklyn. It was a hot, hot day and the scent of the last strawberries in the field nearby filled the air as I filled up my bucket with precious sour cherries. 

Cherries4134.jpg

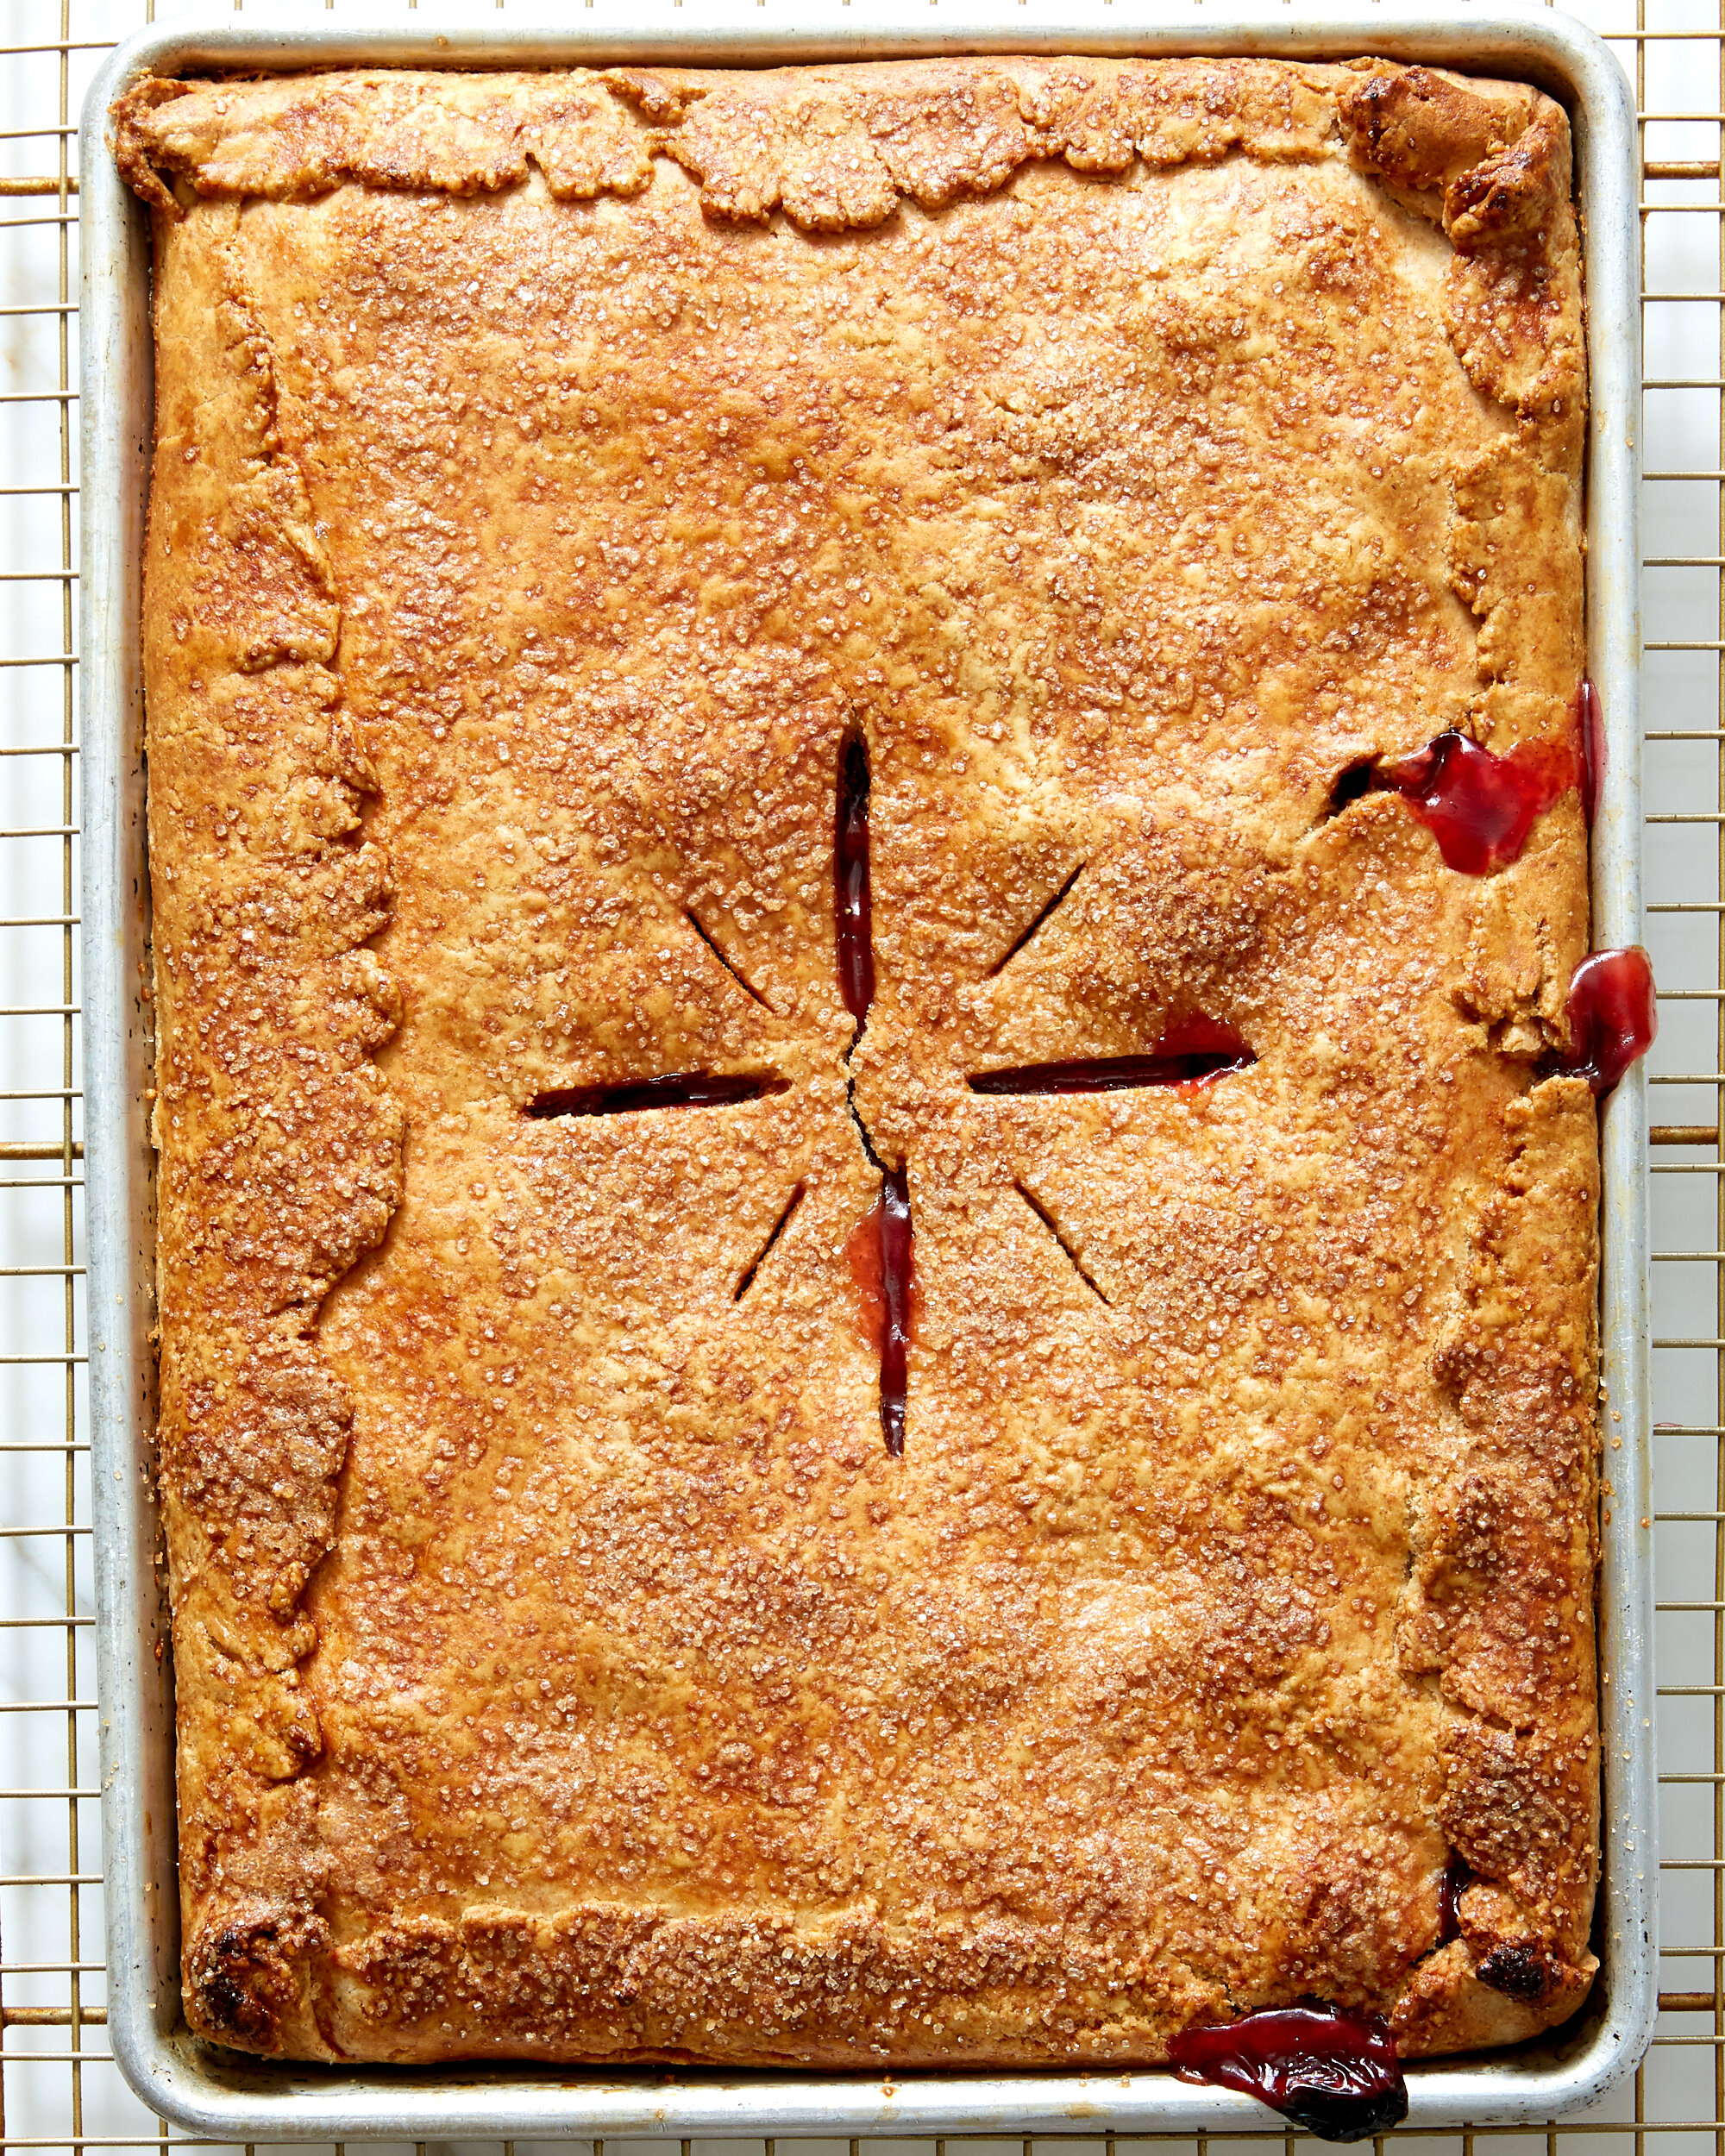
When I got home with my bounty, pie was the only choice. Instead of a traditional round, I went slab style and baked it in a quarter sheet pan. If you don’t have a quarter sheet pan or two, I highly recommend picking one up. At roughly 9x13x1, they are the perfect size to bake focaccia, a few cookies, toast nuts, or roast just about anything…but back to the sour cherries.

Pitting cherries can be kind of a pain, but since sour cherries are so soft, I usually skip the pitter and just use my thumb to ease out the pits. It’s a bit of a sticky, drippy process so you can move your operation to the sink to make clean up super easy.

Cherries4206.jpg

I like my fruit pie fillings pretty simple, especially when the fruit is so special (and hard earned). This one is just sweet enough to highlight the cherries without totally overtaking their tart bite. I also added a bit of vanilla bean paste to round out the flavor, but a little bit of extract will do the trick too.

The all butter pie crust has a bit of rye flour and brown sugar for toasty depth that is delicious with just about any fruit if sour cherries aren’t available where you live. It might be a little intimidating to roll out such a big piece of dough, but don’t you worry. To add both flakiness and structure to the dough, this recipe calls for a series of folds. The folds will make the dough both exceptionally delicious and easier to roll out and move around. Win-win. Check out the gif above to see how it’s done.

Cherries4249.jpg

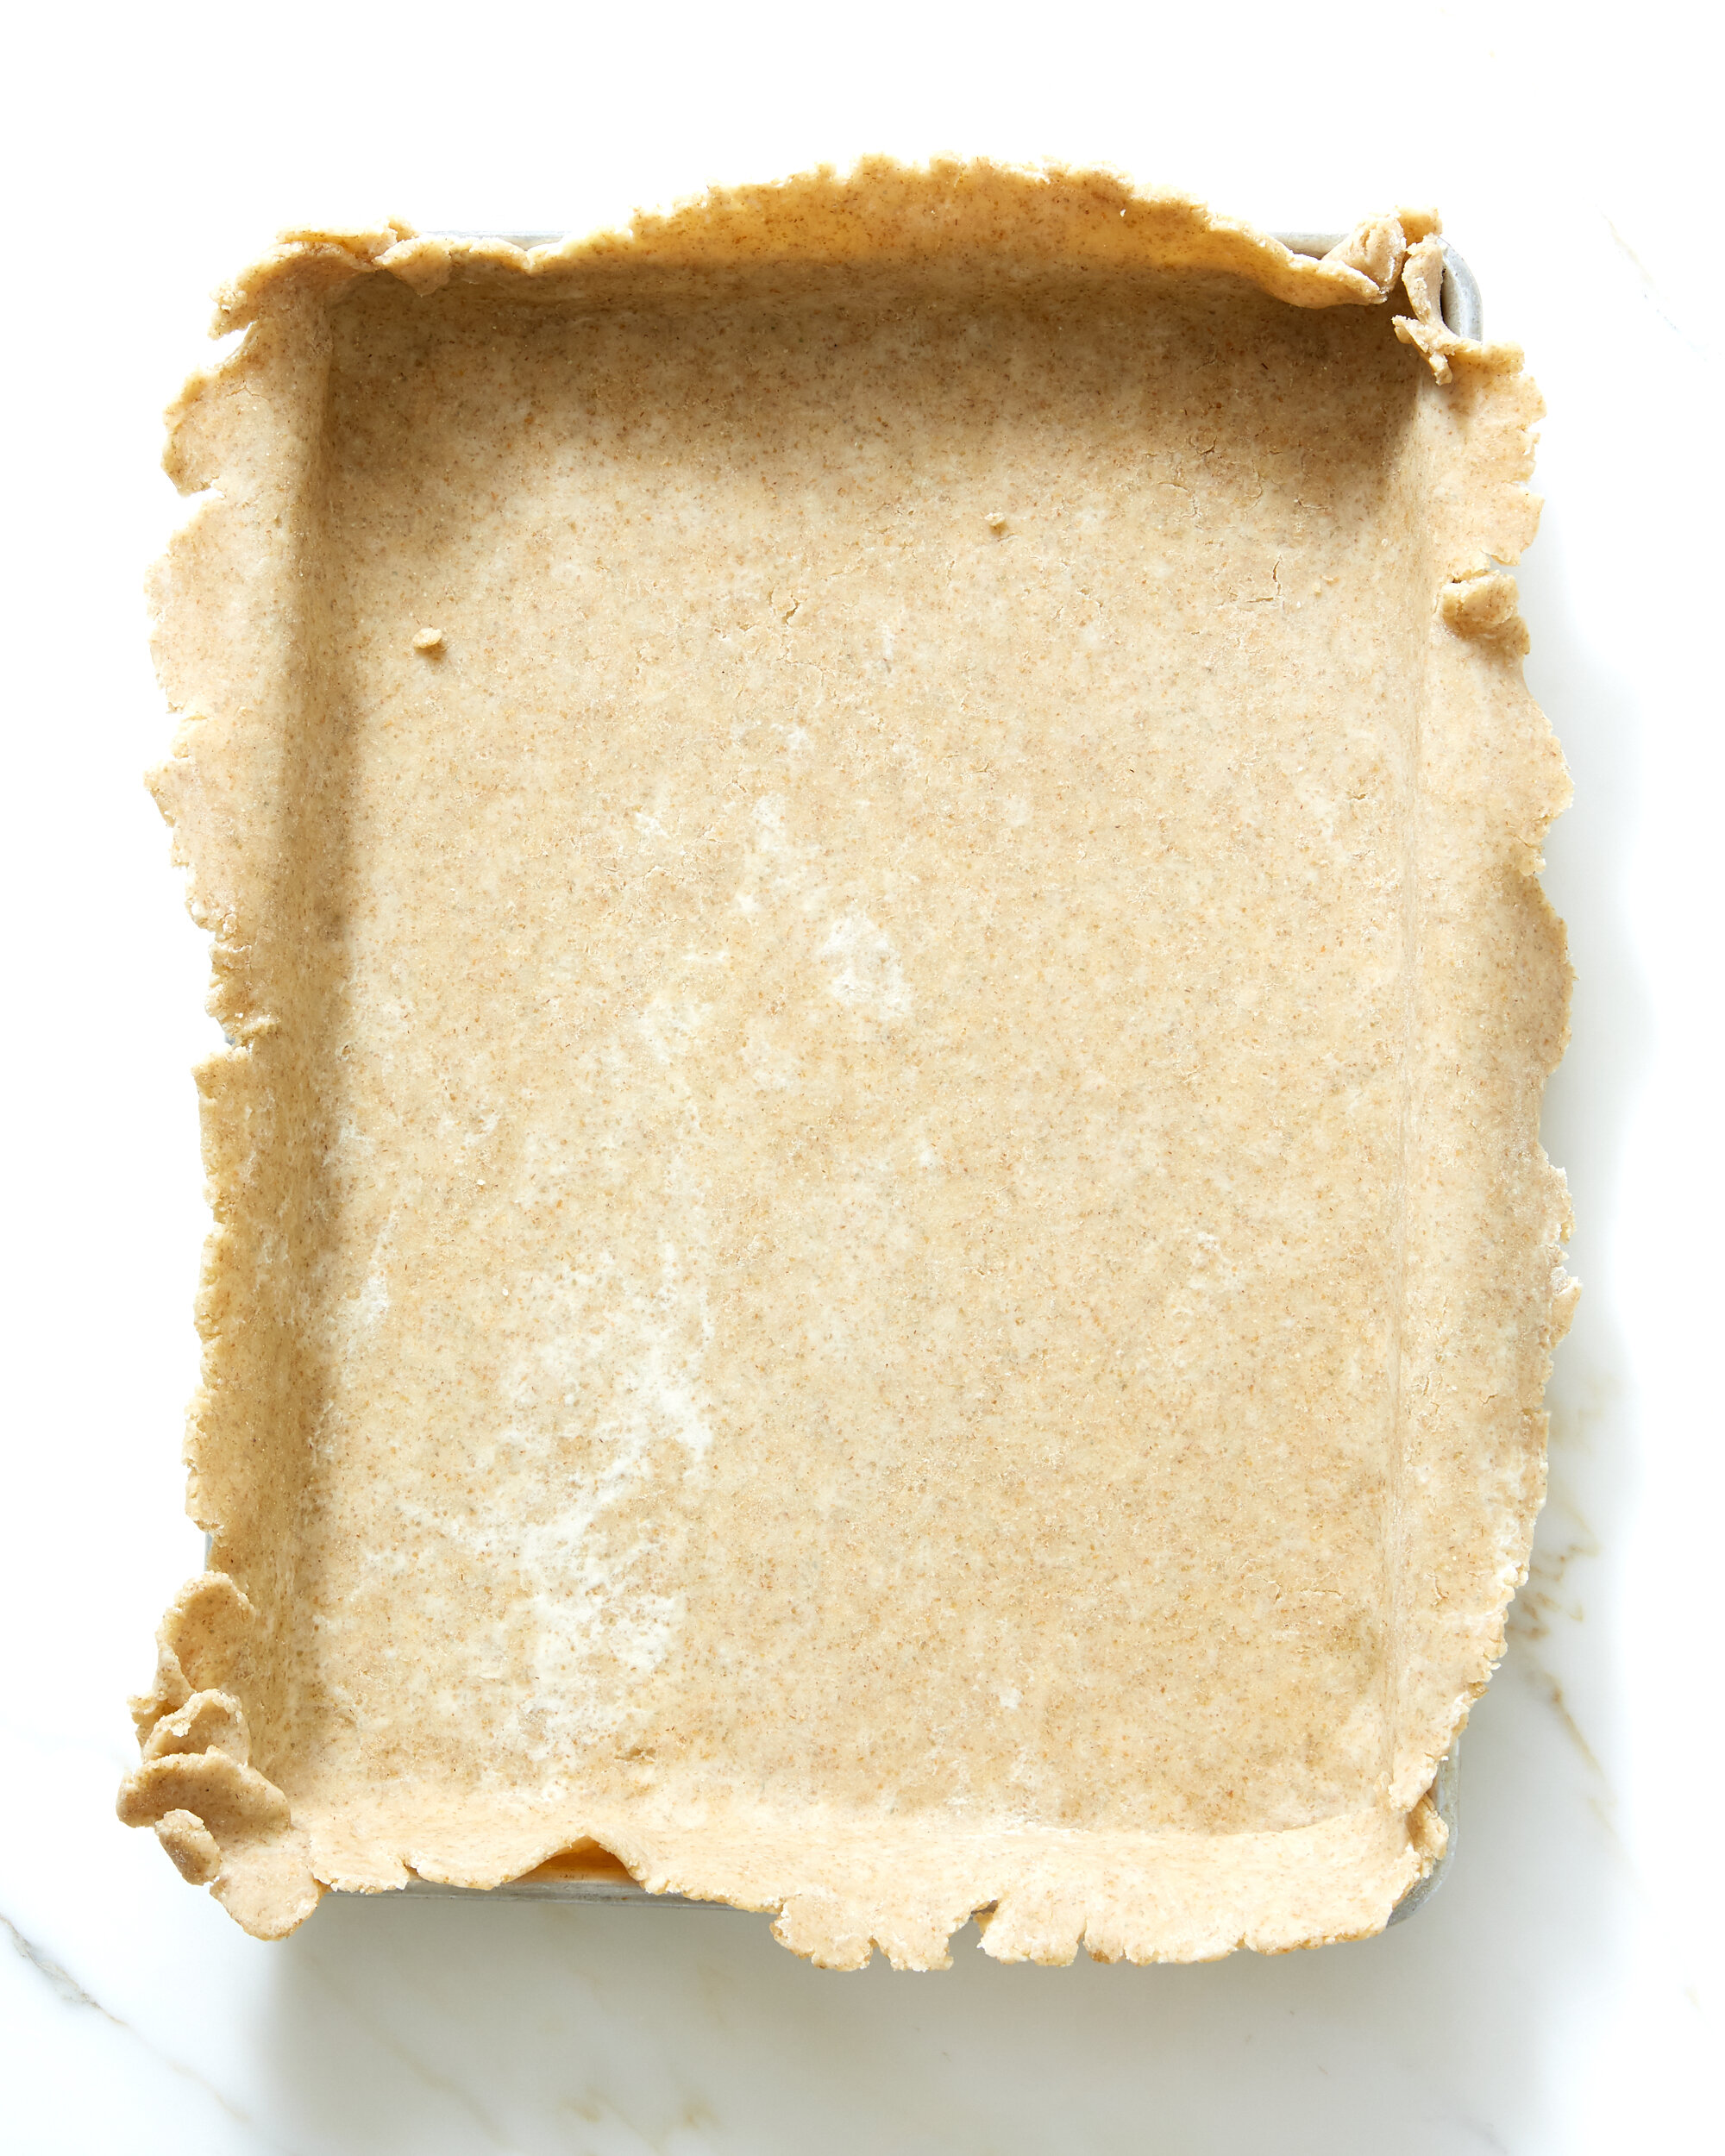
Don’t worry if your dough rips a bit when you roll it out though, you can always pinch it back together. If you have time, make your dough the say before you plan to use it. A long rest will hydrate the dough and make it easier to roll out.

Cherries4280.jpg

I realize, it is a little unfair to share this recipe because sour cherries can be hard to get your hands on, but you still have a few more weeks to seek them out. Frozen will work in a pinch too, or substitute an equal amount of your favorite summer fruit - you will need a little less sugar for sweeter fruit.


Real Deal Cherry Pie

Makes one 1/4 sheet slab pie

This pie makes the best of one of summer’s most fleeting pleasures, sour cherries. They are only available for a few weeks in late June/early July, but they are worth the wait, and the trouble of pitting them. The crust uses a bit of rye flour which adds some nutty and creamy flavor to the crust, and pairs beautifully with fruit desserts. Use an equal amount of all purpose flour if you have rye flour on hand. This filling recipe was lightly adapted from Deb at Smitten Kitchen, who adapted from Martha Stewart, and loves sour cherries as much as I do. 

Rye Crust

340g/2 2/3 cups all purpose flour

170g/1 1/3 cups rye flour (I used Abruzzi Heirloom Rye from Anson Mills)

1 tablespoon brown sugar

1 teaspoon kosher salt

10-12 tablespoons ice water

1 tablespoon apple cider vinegar

340g/1 1/4 cups unsalted butter, cut into tablespoon sized pieces

Filling

900g/about 6 cups pitted sour cherries

3/4 cup + 1 tablespoon (165g) sugar (I used a natural cane sugar here, but granulated works too)

30g/1/4 cup cornstarch

Juice of 1/2 lemon

1 tablespoon vanilla bean paste

Pinch salt

 To finish

1 egg, for egg wash

Turbinado sugar to finish

To make the crust: Add the flours, brown sugar, and salt to a large bowl. Stir them together until combined. Add the apple cider vinegar to the ice water. Working quickly, add the butter to the flour and toss to coat. Then use your fingers or the palms of your hands to press each cube of butter into a flat sheet. Keep tossing the butter as you go to ensure that each butter piece is coated with flour. The idea is to create thin, flat shards of butter that range from about the size of a dime to about the size of a quarter. Sprinkle about 6 tablespoons of the water over the flour mixture and use your hands to mix gently, making sure to get all of the way down to the bottom of the bowl. Continue to add more water a couple of teaspoons at a time. 

You have added enough water when you can pick up a handful of the dough and squeeze it together easily without it falling apart. 

Press the dough together, then pat it into a rectangle. Fold the dough into thirds like a letter, then split it in to two pieces one slightly larger than the other, form each piece into a rectangle and wrap each piece in plastic wrap. Chill the dough for at least one hour before using, or overnight. I prefer an overnight rest if possible.

When you are ready to bake the pie, heat your oven to 400ºF.

Add the pitted cherries, sugar, cornstarch, lemon juice, vanilla bean paste, and salt to a large bowl and stir gently to combine.

Roll the larger piece of the dough on a lightly floured surface into a rectangle about 11x15. Gently tuck it into a metal quarter sheet pan, letting the excess hang over the sides. Roll the other piece of dough into a rectangle about 10x14. 

Pour the cherries into the dough lined pan and top with other piece of dough. Gently fold the bottom dough up and over the top and press gently. Refrigerate the pie until the crust is firm, about 15 minutes.

While the pie chills, beat the egg with a few drops of water to make the egg wash. When the pie is nice and chilled gently brush the surface with egg wash and sprinkle with turbinado sugar. Cut a few vents in the top then bake until the crust is deep golden brown and the juices are bubbling, 45-60 minutes.

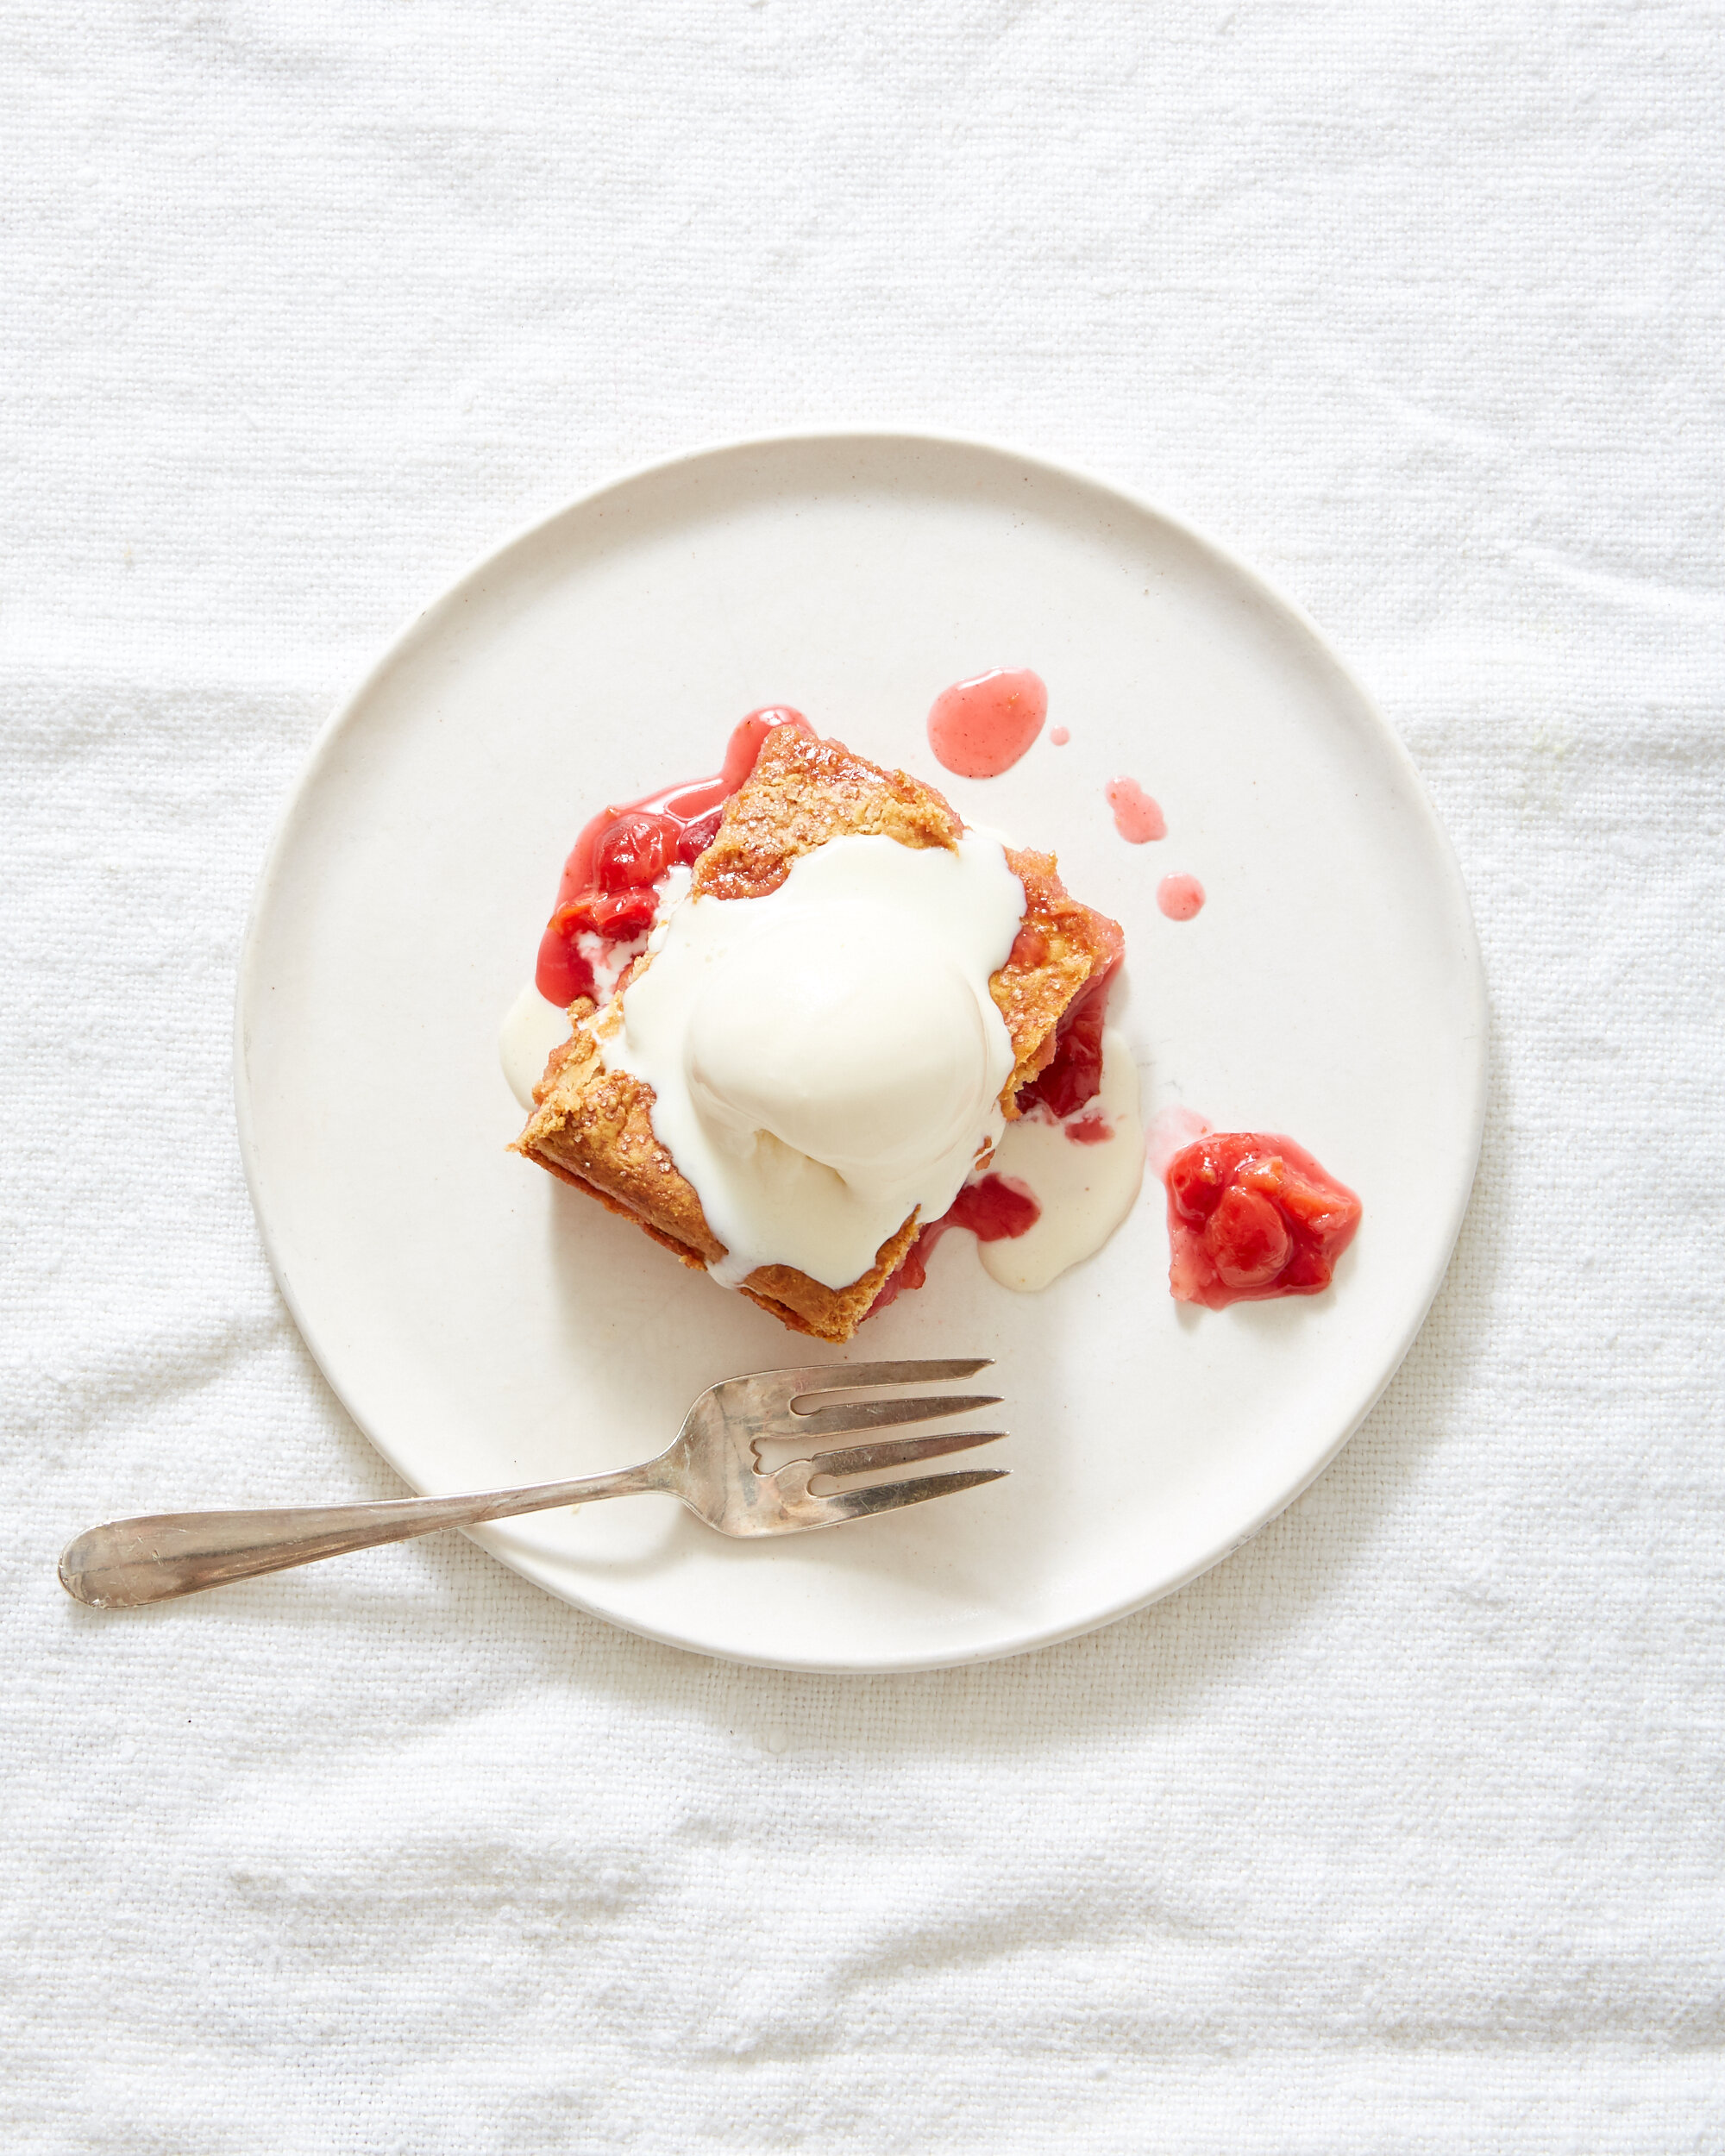
Let the pie cool on a rack before serving warm or at room temperature. Ice cream is optional, but highly suggested.

Banana Cream Pie

Classic Banana Cream Pie with a cookie crumb crust, vanilla pudding, fresh bananas, and fresh whipped cream is the treat you need right now.

BananaCreamPie_Apt2BBakingCo6541.jpg

This Classic Banana Cream Pie is from Erin Jean McDowell’s STUNNING new MASTERPIECE - The Book on Pie (affiliate link). This book has something for everyone from brand new beginners to experienced bakers looking to up their game.

BananaCreamPie2.gif

There are recipes for everything from perfect dough to some of the most beautiful decorative crusts, juicy fruit fillings, and towering gorgeous toppings I’ve ever seen. For my first bake from the book, I wanted to choose a classic and also something with PUDDING and whipped cream. Because, hello, pudding is an incredibly delicious food that doesn’t get enough credit.

BananaCreamPie_Apt2BBakingCo6533.jpg

Erin’s version of this classic has a roll out crust, but had some chocolate cookies and biscoff to use up (and I didn’t have the patience to chill pie dough) so I went the crumb crust route, but I don’t think Erin would mind. The book is made to mix and match crusts, toppings, and fillings to your hearts content, and every recipe has amazing troubleshooting tips and variations too. Happy Pie Baking everyone!

The Book on Pie Cover.jpg

Classic Banana Cream Pie

Excerpted from THE BOOK ON PIE © 2020 by Erin Jeanne McDowell. Photography © 2020 by Mark Weinberg. Reproduced by permission of Houghton Mifflin Harcourt. All rights reserved. 

MAKES: ONE 9-INCH/23-CM PIE

DIFFICULTY: MEDIUM

FILLING

452 g / 2 cups whole milk

118 g / 1/2 cup heavy cream

150 g / 3/4 cup granulated sugar

37 g / 1/3 cup cornstarch

3 g / 3/4 teaspoon fine sea salt

56 g / 2 large eggs

64 g / 3 large egg yolks

28 g / 1 ounce / 2 tablespoons unsalted butter

10 g / 2 teaspoons vanilla extract 

One 9-inch / 23-cm pie crust (see below), blind-baked, and cooled completely

450 g / 3 or 4 medium bananas, peeled and thickly sliced

Full Batch of Classic Whipped Cream (page 111/below)

1.     Make the filling: In a medium pot, bring the milk and heavy cream, to a simmer over medium heat, stirring occasionally.

2.     Meanwhile, in a medium bowl, whisk the granulated sugar, cornstarch, and salt to combine. Add the eggs and yolks and whisk well to combine.

3.     When the milk mixture comes to a simmer, pour about one quarter of it into the eggs, whisking constantly to temper them. Pour this mixture back into the pot, whisking constantly. Reduce the heat to medium-low, switch to a silicone spatula, and cook, stirring constantly, until the mixture thickens and large bubbles break the surface. Remove from the heat and stir in the butter until it’s melted and the pudding is smooth. Stir in the vanilla.

4.     Strain the pudding into the cooled pie crust and spread into an even layer. Cover the filling with plastic wrap placed directly against the surface and refrigerate until fully cooled and set, at least 2 hours (or up to 24 hours).

5.     When ready to serve, remove the plastic wrap and arrange the bananas in an even layer on top of the pie, overlapping the slices so they are well packed together. Spread, spoon, or pipe the whipped cream topping on top. 

MAKE AHEAD AND STORAGE

The crust can be blind-baked up to 24 hours head. The pie can be prepared through step 4 up to  24 hours ahead and kept refrigerated. Store leftovers in the refrigerator in an airtight container.

 Basic Crumb Crust

MAKES: ONE 9-INCH/23-CM PIE

DIFFICULTY: EASY

Crumb crusts are even easier than press-in cookie crusts. You don’t even have to bake them—see the variation at right. The crumbs can be made out of cookies, crackers, cereal, pretzels, even potato chips! Sometimes sugar or other flavorings are added to the crumbs (here the sugar is optional), and then fat (usually melted butter) is added to bind the mixture to form a crust. The crumbs can be coarse, for a crunchier texture, or finer, for a smoother texture. Different base ingredients will behave differently, so the first time I test a crumb crust with a new ingredient, I always have a little extra on hand in case I need more crumbs, or a little extra melted butter, should it be needed.

Crumb crusts don’t generally require chilling before baking, but you can refrigerate for up to 1 hour or freeze for 15 minutes, if desired, to firm them up before baking. I’m also including information in a chart on page 40 to help you adapt this easy recipe for any pan size.

 210 g / 1¾ cups cookie, cereal, chip, or cracker crumbs (I used half chocolate cookies and half biscoff -Yossy)

Up to 50 g / ¼ cup granulated sugar (optional) (I skipped it because my cookies were very sweet - Yossy)

2 g / ½ teaspoon fine sea salt

85 g / 3 ounces / 6 tablespoons unsalted butter, melted, plus more if needed

1.     In a medium bowl, stir the crumbs, sugar, if using, and salt together to combine. Stir in the melted butter and mix to combine. The crust should easily hold together in clumps when you press it together between your fingers (if it doesn’t, add a little more melted butter, 14 g /  1 tablespoon at a time, until it does).

2.     Press the crust evenly into the bottom and up the sides of an ungreased 9-inch / 23-cm pie plate: First make an even layer in the bottom of the pan, then press the rest of the crumbs up the sides (or halfway up the sides—see page 61). Sometimes I use the bottom of a small dry measuring cup to help press the crust in evenly; this is especially helpful in the corners of the pan.

3.     Preheat the oven to 350°F / 175°C (don’t use a Baking Steel/stone when baking a crumb crust). To parbake the crust, bake (no docking or pie weights required) for 10 to 12 minutes, until it begins to lightly brown at the edges (or, for darker crumbs, smells lightly toasty). To blind-bake the crust, bake for 15 to 17 minutes, until it is deeply golden brown and/or smells toasty.

PIE PEP TALK

What to Do When a Crumb Crust Shrinks: One of the most common problems I’ve seen with crumb crusts is that they can shrink or slump down the side of the pie plate when the crust is parbaked. Luckily, this is easily corrected. If you notice that your crust is starting to shrink, remove it from the oven and use a crust tamper (see page 20) or a small metal measuring cup to press the crust that slumped down back up the sides of the pie plate. If this happens consistently when you make crumb crusts, try tamping them down more aggressively and/or refrigerating for 30 minutes before baking.

Classic Whipped Cream

MAKES: 141, 283, OR 422 G / 1, 3, OR 4 CUPS, DEPENDING ON THE BATCH YOU CHOOSEDIFFICULTY: 

DIFFICULTY: EASY

It’s never a bad idea to serve pie with plenty of whipped cream. Think your pie is sweet enough? You can leave the sugar out—ain’t nothin’ wrong with plain ol’ whipped cream. For a luxurious twist, try the mascarpone variation below.

 FULL BATCH (for generously covering the whole pie)

235 g / 1 cup heavy cream

50 g / 1/4 cup granulated sugar

5 g / 1 teaspoon vanilla extract (optional)

1.     In the bowl of a stand mixer fitted with the whip attachment, whip the cream on medium-low speed until it begins to thicken, 1 to 2 minutes. Increase the speed to medium and add the sugar in a slow, steady stream, then continue to whip to medium peaks. Add the vanilla, if using, and mix to combine.

 MAKE AHEAD AND STORAGE

Plain whipped cream is best made just before it is used, but you can intentionally under-whip the cream (to just under soft peaks), then finish by whipping by hand when you’re ready to serve. It will hold this way for up to 4 hours. The mascarpone variation can be made up to 6 hours ahead and held in the refrigerator. Whip a few times gently to refresh before using.


Excerpted from THE BOOK ON PIE © 2020 by Erin Jeanne McDowell. Photography © 2020 by Mark Weinberg. Reproduced by permission of Houghton Mifflin Harcourt. All rights reserved. 


BananaCreamPie_Apt2BBakingCo6539.jpg