Pumpkin Spice Donut Cake

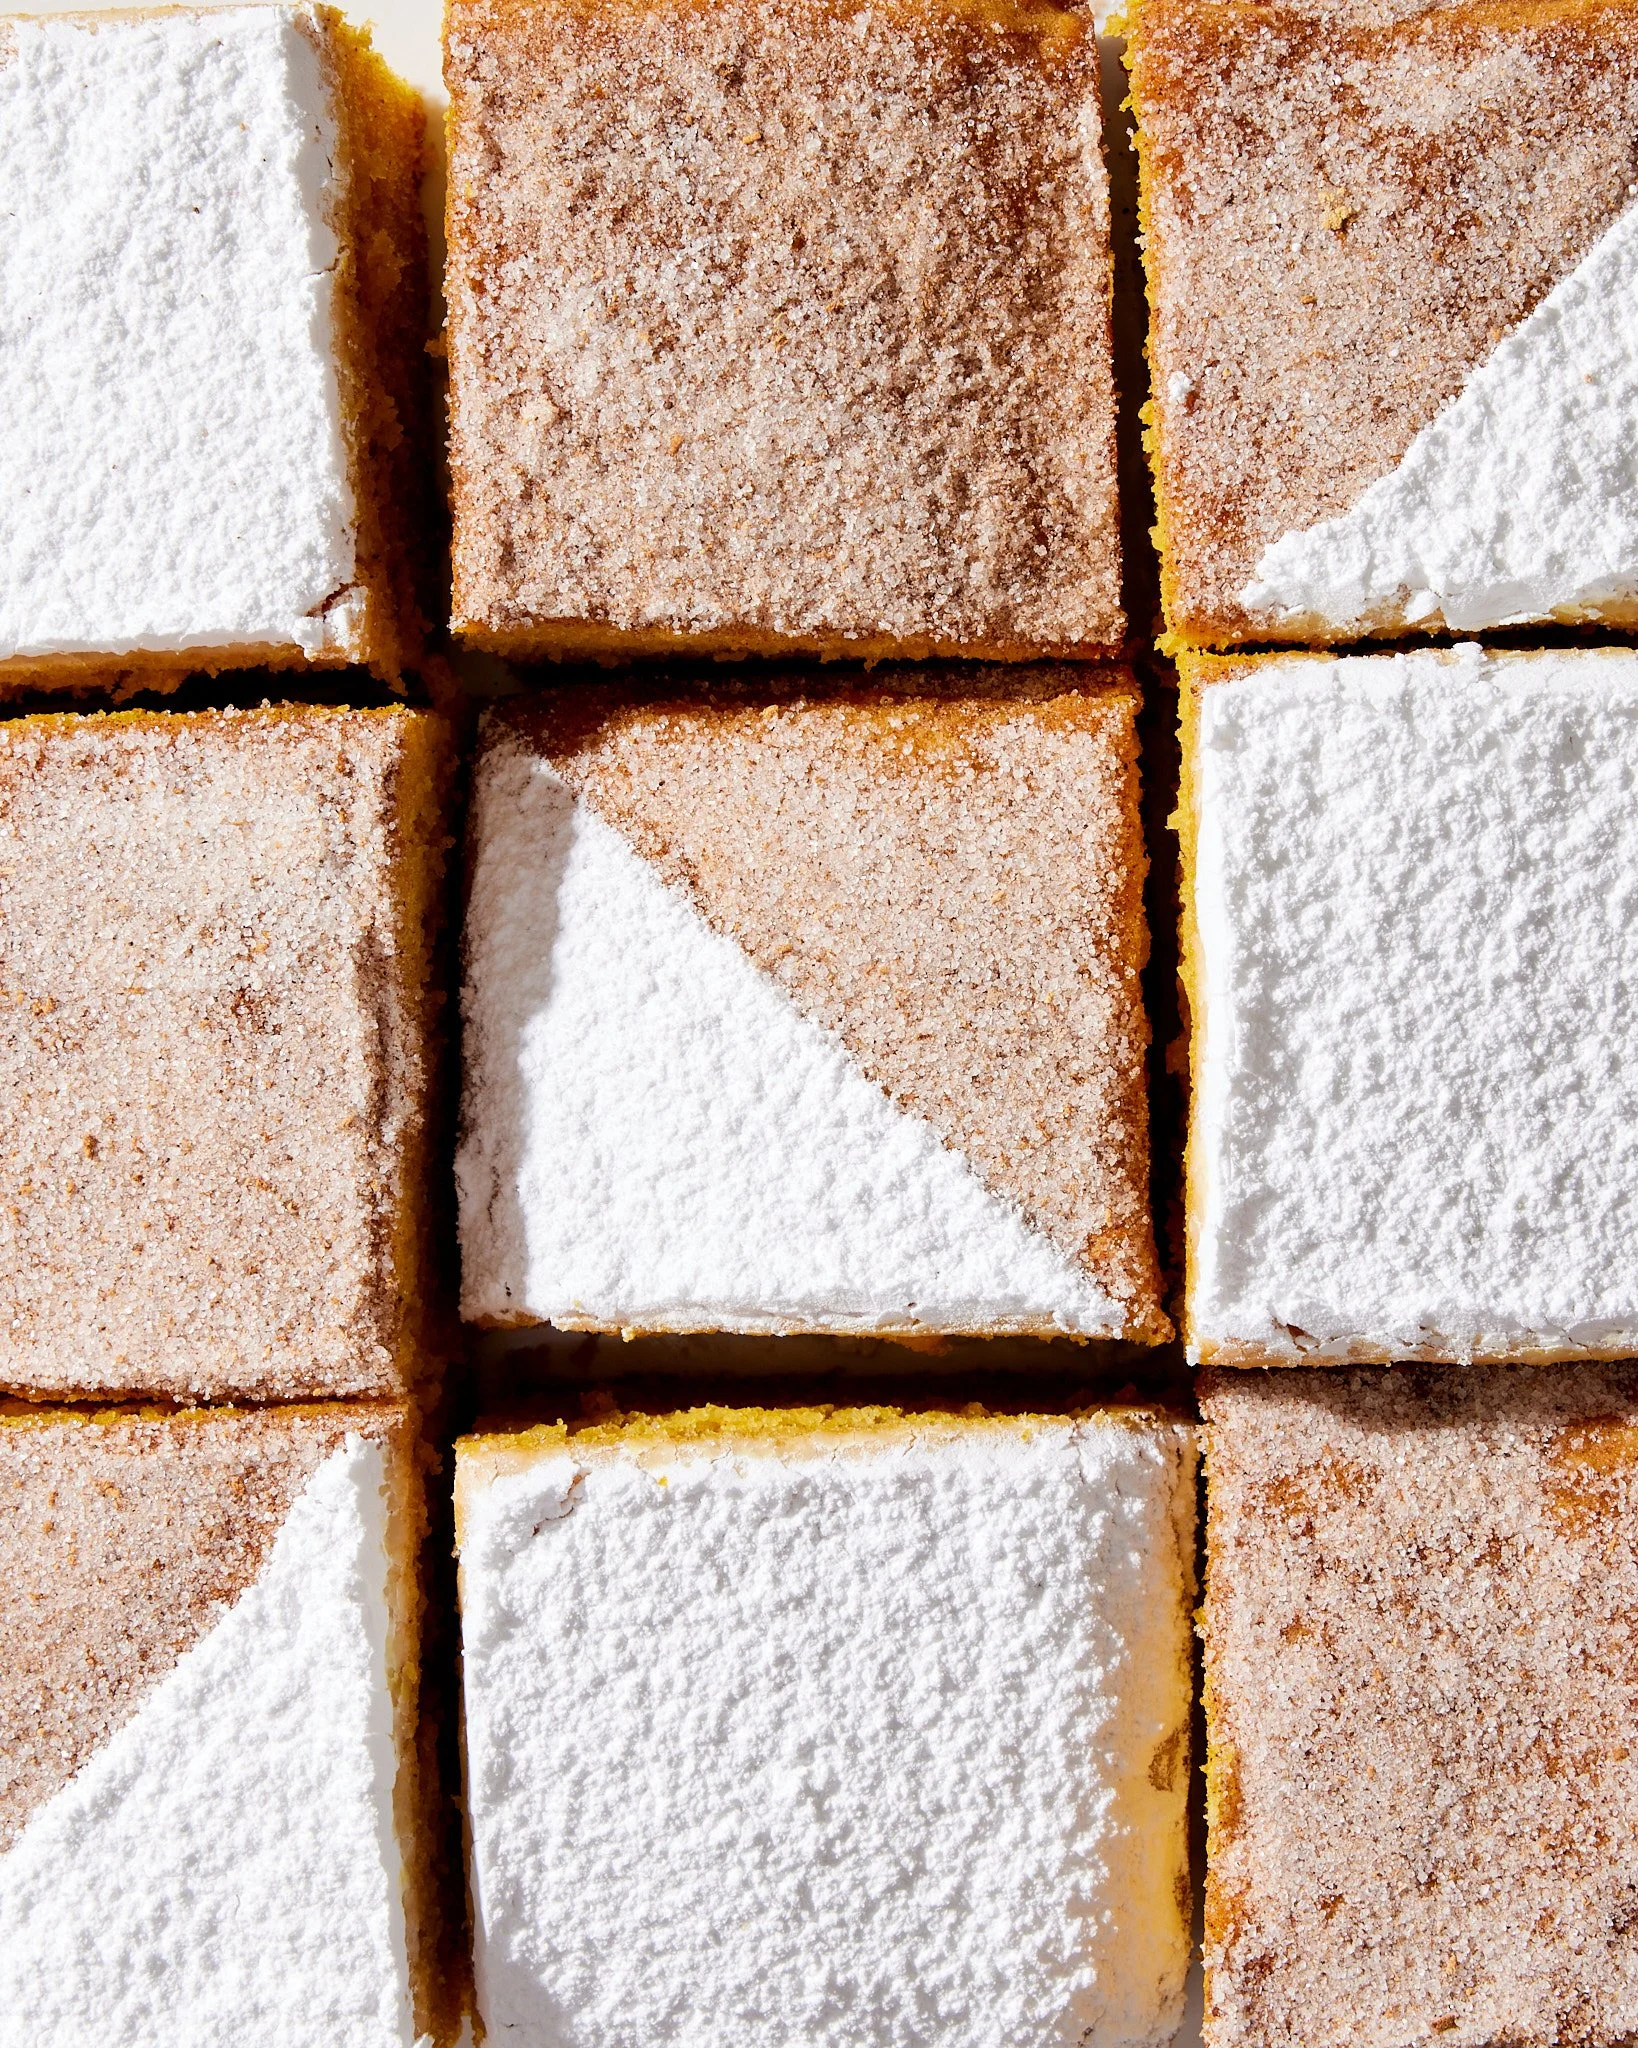
This cozy and sweet pumpkin cake is a riff on the super popular powdered donut cake from my book Snacking Cakes. All you need is a bowl, whisk and pan to put this perfect little fall cake together in less than an hour. It is packed with lots of fall (pumpkin!) spices, pumpkin puree and buttermilk just enough sweetness to be a treat. This cake keeps well for a few days on the counter so you can enjoy it one sliver at a time, you can also freeze the cake without the topping for a rainy day.


Pumpkin Spice Donut Cake

Makes 1, 8-inch square or 9-inch round cake

Cake

3/4 cup (150g) granulated sugar

2 large eggs

3/4 cup (165g) pumpkin puree

1/2 cup (100g) well shaken buttermilk

1/2 cup (113g) unsalted butter, melted

1 teaspoon pumpkin spice blend

1/2 teaspoons freshly grated nutmeg

3/4 teaspoon kosher salt

1 3/4 cups (225g) all-purpose flour

1 1/2 teaspoons baking powder

1/4 teaspoon baking soda

Topping

1 tablespoon unsalted butter melted

3 tablespoons confectioners' sugar or 2 tablespoons granulated sugar mixed with 1 teaspoon pumpkin spice

Make the cake: Position an oven rack to the center of your oven and preheat the oven to 350F. Butter or coat an 8-inch square baking pan with nonstick spray. Line the pan with a strip of parchment paper that hangs over two of the edges. 

In a large bowl, whisk the granulated sugar and eggs until pale and foamy, about 1 minute. Add the pumpkin, buttermilk, butter, pumpkin spice, nutmeg, and salt. Whisk until smooth and emulsified. 

Add the flour, baking powder, and baking soda. Whisk until well-combined and smooth. 

Pour the batter into the pan and bake the cake until puffed and golden, and a skewer inserted into the center comes out clean, 30 to 35 minutes. Set the pan on a rack to cool for about 15 minutes. Then use the parchment paper to lift the cake out of the pan and set it on to the rack to cool almost completely.

To Assemble: While the cake is just warm to the touch, brush the top with the melted butter and dust with the confectioners' sugar or spiced sugar you should have a nice thick layer of sugar - more than you think might be necessary. (Store the cake, covered, at room temperature for up to three days. The cake will absorb the sugar on top, so it might need a fresh dusting of confectioners' sugar after the second day.

Gingerbread Cookies

181220_GingerbreadZI4A8462 1.jpg
gingerbread cookies | apt 2b baking co

My favorite gingerbread cookies have been up on the site, but a little hidden within another post, for a long time. So, this year I decided to give them a little refresh and some new fun photos. These can be made into cookie ornaments too! Just make sure to bake them for an extra minute or two, until they are crisp and dark brown, and don’t forget to poke a hole in the cookies before baking. I love the contrast of the deep golden cookies and white icing so I tend to ice these guys really simply with lines and dots of royal icing and lots of sparkly sanding sugar.


Gingerbread Cookies with Royal Icing

makes about 3 dozen 3-inch cookies

adapted from Simply Recipes

3 1/4 cups (415g) all-purpose flour


3/4 teaspoon baking soda

2 teaspoons ground ginger


2 teaspoons ground cinnamon 

1/2 teaspoon ground cardamom

1/4 teaspoon finely grated nutmeg

1/4  teaspoon finely ground black pepper 

1/4  teaspoon allspice


1 teaspoon kosher salt


14 tablespoons (200g) unsalted butter, softened

1/2 cup (110g) packed dark brown sugar 

1 large egg


1/2 cup unsulfured molasses 


In a large bowl, whisk the flour, baking soda, salt and spices together. 

In a stand mixer, cream the butter and sugar together until light and fluffy. Add the egg, then the molasses and mix until well combined. With the mixer on low speed, gradually add the flour mixture and mix until thoroughly combined. Divide the dough in half, wrap each half in plastic and refrigerate for at least one hour before rolling.


Heat oven to 350ºF and line two baking sheets with parchment paper.

Working with 1/2 of the dough at a time roll the dough 1/8-1/4-inch thick on a lightly floured surface using a lightly floured rolling pin roll. Use a cookie cutter or stencil to cut out desired shapes then place them on the prepared baking sheets. For cookie ornaments, use a skewer to poke a hole through the top of the cookies before baking.
Bake for 8-10 minutes or until the edges of the cookies have just barely begun to brown. For cookie ornaments bake the cookies until they are lightly browned all over and firm to the touch. Cool the cookies on the sheet pans for a few minutes and then transfer to a cooling rack
to cool completely. Decorate as desired.

Royal Icing

1 pound confectioners sugar, sifted

6 tablespoons pasteurized egg whites

1 teaspoon lemon juice

1 teaspoon vanilla extract

pinch salt

For the Icing

In the bowl of a stand mixer fitted with the whisk attachment combine all of the ingredients. Whisk on low speed until the sugar is moistened, then turn the mixer up to medium and whisk until smooth and glossy. 

For piping lines and shapes you’ll want thick icing. When you lift the whisk out of the bowl the icing should flow in thick ribbons that will hold their shape when they fall into the bowl below. Add a bit more confectioner’s sugar to the mixture if necessary to achieve this texture. Fill a piping bag with the icing and have fun!

For flooding and complete coverage of the cookies you’ll want thinner icing that holds its shape for a few seconds, then melts into the icing in the bowl. Add a bit more water, one teaspoon at a time to achieve this texture. Color the icing as desired.

Use the icing right away or store in an airtight container, with a piece of plastic wrap pressed against the surface to prevent a skin from forming, in the refrigerator for up to 3 days. Stir until smooth before using. Color the icing as desired.,


Royal Icing Tips and Tricks

Fit a piping bag with a small round tip #1 or #2 to pipe lines and shapes and/or another piping bag with a slightly larger tip #3 or #4 for flooding. Fill each bag with the corresponding icing and have fun! Practice on a piece of parchment paper if you are nervous, but truly if you think you messed up - just cover your cookies with sprinkles! 

For the trees in this post I used the flooding icing to draw a line around the border of each cookie, then filled it in completely and sprinkled to my heart’s content. After the trees had dried slightly I went back and used the piping icing to draw the trunks. 

You can also use a spoon to cover the cookies with thinner flooding icing or dip them, have fun! Don’t worry to much about it!

If you are adding sanding sugar or sprinkles to your iced cookies you’ll want to add them just after you pipe the icing. Royal icing will develop a dry skin very quickly, so have your sprinkles at the ready.

If you’d like to pipe lines that sit on top on top of flooded cookies, let the flooding icing dry all of the way or the lines will melt into the flooded icing.

In any case make sure to let the cookies dry all of the way, uncovered, before stacking or packaging, I like to leave mine overnight.

gingerbread cookies | apt 2b baking co